In this post, I’m going to show you how to assign privilege level 15 with Cisco ISE through RADIUS. We know Cisco ISE amazingly supports network devices administration through TACACS+ protocol which allows granting different access levels and managing what command sets could be run in each level. However, this feature requires an additional license called Device Administration to be installed on ISE.
TACACS+ has a few advantages over RADIUS when it comes to devices administration. However, in some small/medium environments having different admins access levels might not be required, and the only requirement would be just to give privilege level 15 to all admins that are in a specific AD group.
Now the question is, can we accomplish this with ISE without having the device administration through TACACS+ feature enabled?! let’s find out this together how we can assign privilege level 15 with Cisco ISE! 🙂
ISE authorization profiles are mainly used to define what actions we want to apply for a matched rule on the policy sets. Authorization profiles can really do a lot of things, there are plenty of options we can leverage. Also, by looking at the list of options we might find that not all of them are self-explanatory.
In our case we want to allow all the admins in a specific AD group to get privilege level 15 directly when they connect to network devices through SSH. This requires a few things to be created on ISE such as creating network devices, adding the AD group where the admins are located, creating an authorization profile and creating a new policy set.
In addition, there are some other configuration required to be applied on the network devices themselves mainly to enable aaa and RADIUS authentication and authorization. We will go only through the most relevant configuration parts in this post.
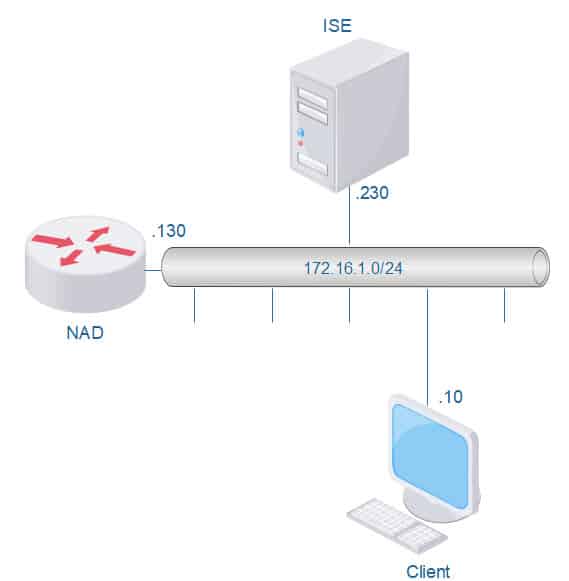
Our topology for this lab is very simple, ISE, the router and the client are all on the same broadcast domain, however, we can also have them in different broadcast domains if required:
TOPOLOGY
ISE AUTHZ PROFILE PRIVILEGE LEVEL 15
Let’s get started with ISE configuration. First we will create a new authorization profile and we will call it R1_PRIV_15. The option we are after is called Web Authentication (Local Web Auth). This option allows ISE to push Cisco AV Pair attribute priv-lvl=15 inside the RADIUS packets to the network device:
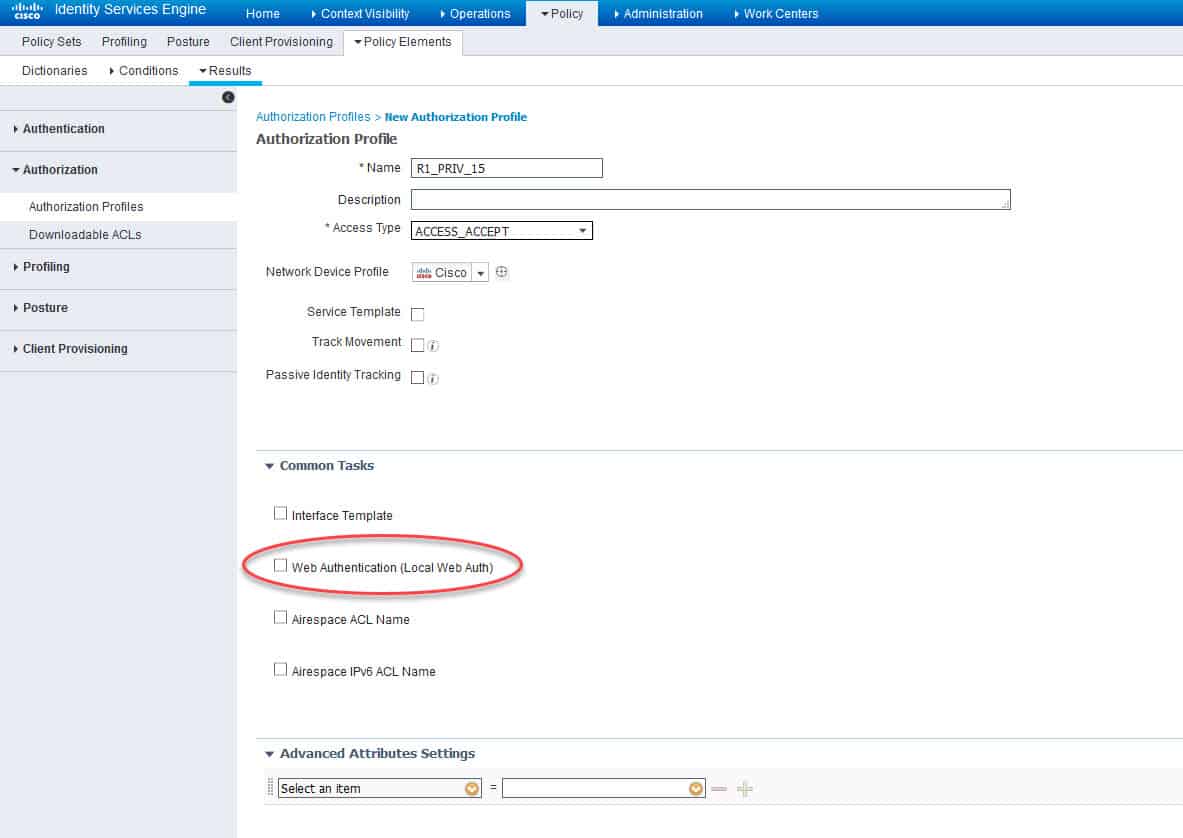
Let’s enable this option, and verify what attributes will be associated with it:

As we can see, by enabling the Web Authentication (Local Web Auth) option we can see the Cisco AV Pair attribute priv-lvl=15 in the attributes details section.
ADD the NETWORK DEVICE
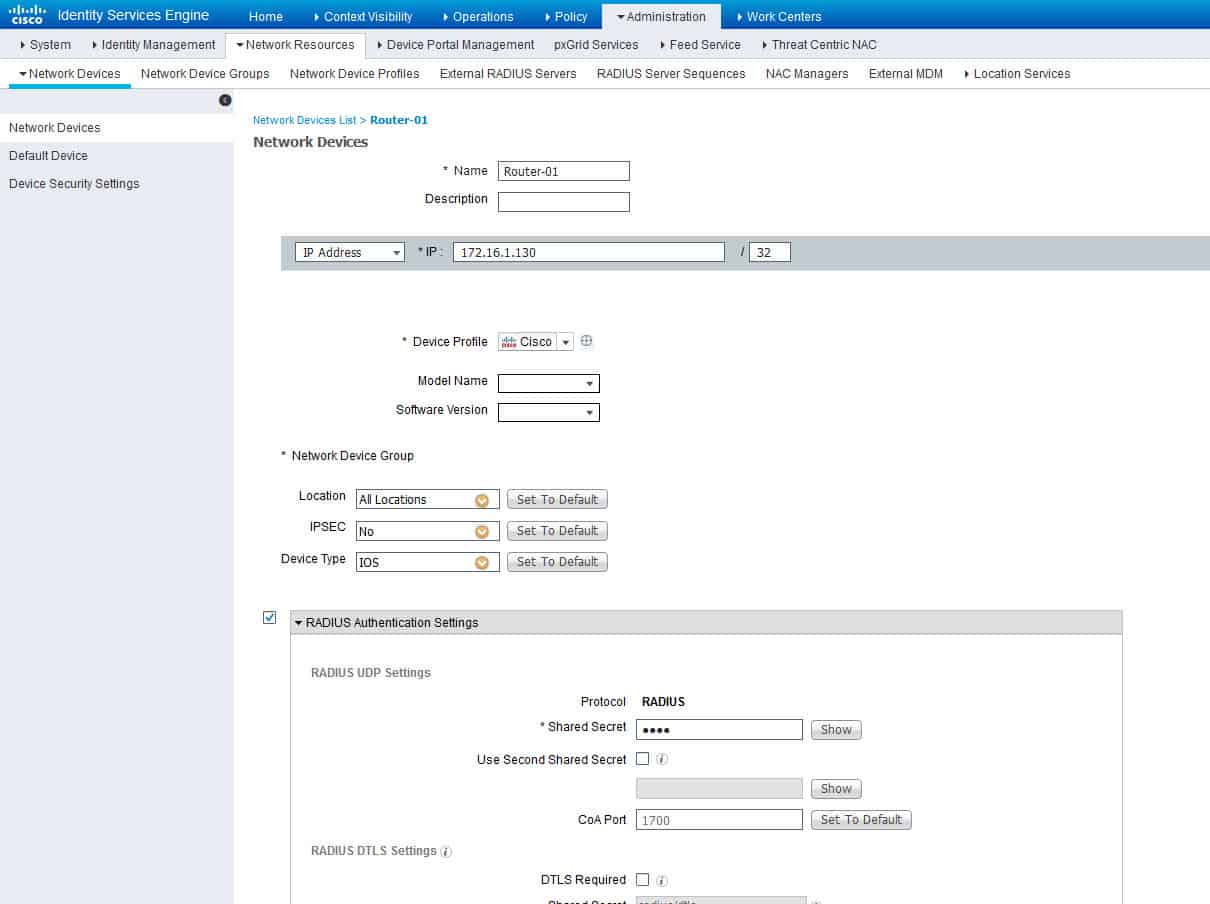
Now let’s create a network device and configure its Device Type as IOS. The Device Type will be used in the top conditions on the policy set, we will see this later. We are going to call the network device Router-01:
JOIN ISE TO THE AD
Now let’s make sure we have the AD group LabAdmins already added:
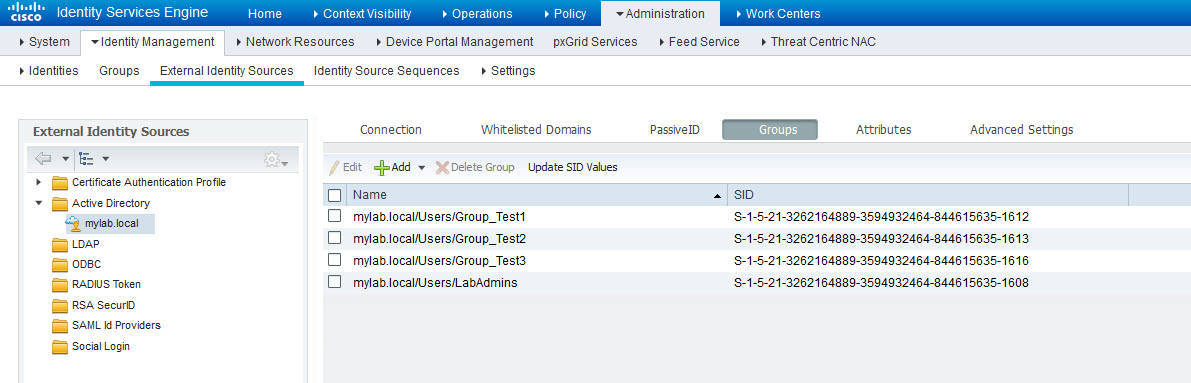
As we can see the last group on the list is the LabAdmins group.
ISE POLICY SET
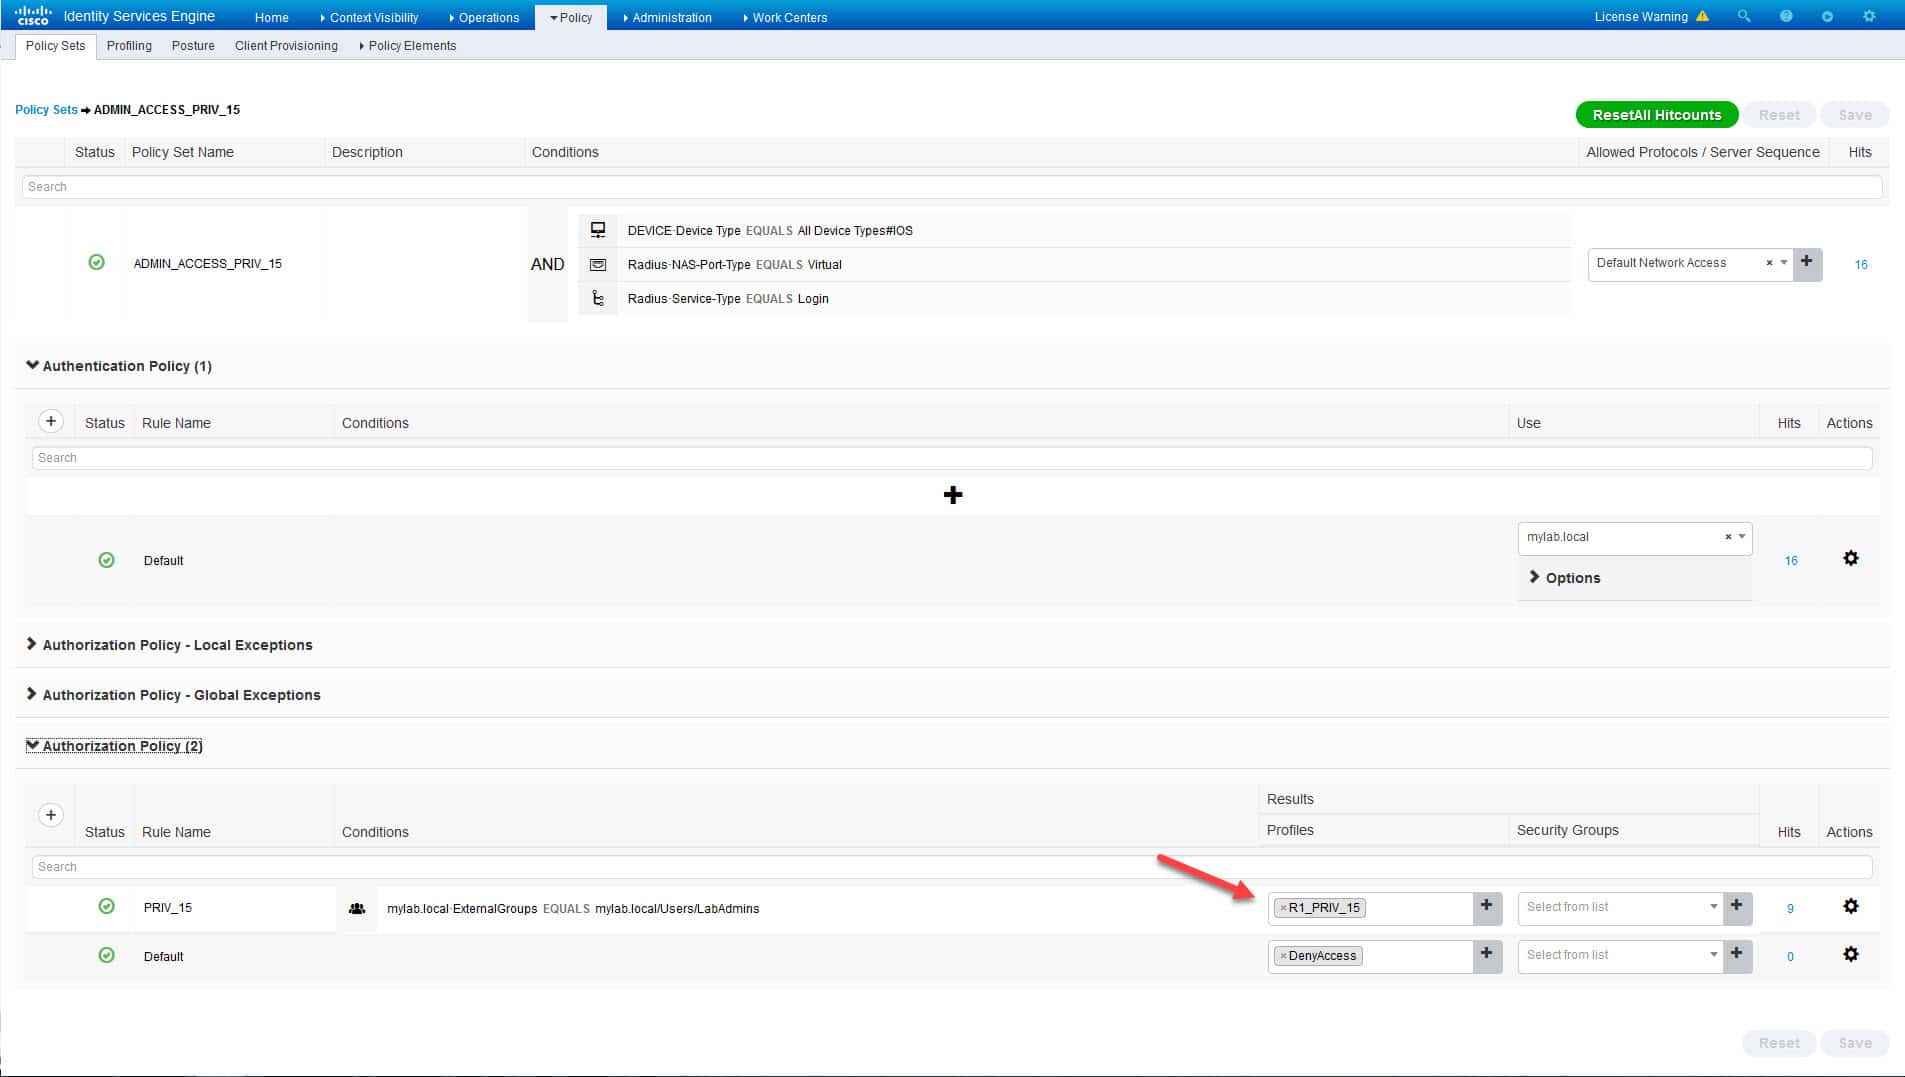
Now let’s create a new policy set and call it ADMIN_ACCESS_PRIV_15. As mentioned above this policy set will have some conditions on the top to match the traffic coming from the network device Router-01. The conditions are the Device Type which we configured as IOS, the RADIUS NAS Port Type which is Virtual in this case, and the RADIUS Service Type which is Login.
All these conditions should match for any SSH connection to Router-01. The point here is to make the policy set as much accurate as possible to match the exact traffic that should be served by itself. In the authentication section we will configure the authentication against the AD which is already joined to ISE.
And finally in the authorization section we will configure a rule with a condition to check if the users are located in the AD group LabAdmins, if so, then the authorization profile we created earlier which is called R1_PRIV_15 will be applied, instead if no match, the default authorization rule will be applied which will deny accesses:
ROUTER RADIUS CONFIGURATION
Now that we have applied all the required configuration on ISE, let’s move on and apply the required configuration on the Router-01. Mainly what we need is to enable aaa, configure the RADIUS authentication and authorization, associating aaa authentication and authorization method lists to the VTY lines, and restricting the accesses to the VTY lines for SSH only:
aaa new-model
c
ip radius source-interface GigabitEthernet0/0
c
radius-server attribute 6 on-for-login-auth
c
radius server ISERADIUS-01
address ipv4 172.16.1.230 auth-port 1645 acct-port 1646
automate-tester username whatever
key WHATEVER
radius server ISERADIUS-02
address ipv4 172.16.1.231 auth-port 1645 acct-port 1646
automate-tester username whatever
key 7 WHATEVER
c
aaa group server radius ISERADIUS
server name ISERADIUS-01
server name ISERADIUS-02
c
aaa authentication login PRIV_15 group ISERADIUS local
aaa authorization exec PRIV_15 group ISERADIUS local
aaa session-id common
c
line vty 0 4
authorization exec PRIV_15
login authentication PRIV_15
transport input ssh
line vty 5 924
authorization exec PRIV_15
login authentication PRIV_15
transport input ssh
One thing worth mentioning here is that if we want to use the RADIUS Service Type in our conditions on ISE, then we need to enable radius-server attribute 6 on-for-login-auth, if not the RADIUS Service Type would be ignored in the RADIUS packets.
VERIFICATION
All the required configurations are now in place. Let’s do some tests by initiating SSH connection from the client, and trying to connect to the router with the admin1 username which is located in the AD group LabAdmins:
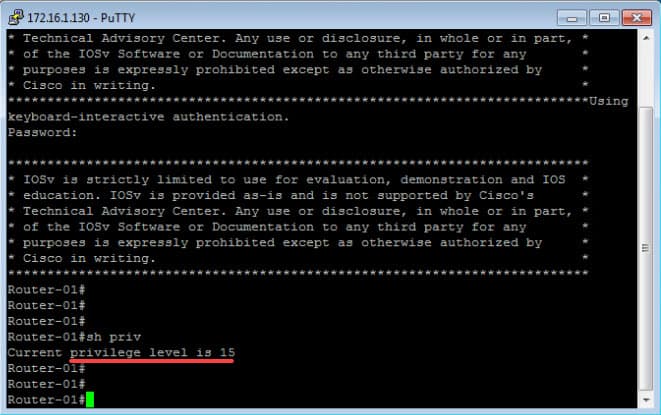
As we can see, we have successfully logged into the router, and we have been straightaway placed into privilege level 15. We can verify that by looking at the # symbol or by using the command show privilege. We can also verify the connected username by using the command show users:
Router-01#show users
Line User Host(s) Idle Location
* 0 con 0 idle 00:00:00
578 vty 0 admin1 idle 00:00:23 172.16.1.10
c
Interface User Mode Idle Peer Address
Finally, let’s look at RADIUS debugs and see what are the most relevant attributes for our SSH connection that have been exchanged between Router-01 and ISE:
*Sep 2 00:47:57.877: RADIUS/ENCODE(0000001B): ask “Password: ”
*Sep 2 00:47:57.878: RADIUS/ENCODE(0000001B): send packet; GET_PASSWORD
*Sep 2 00:48:06.398: RADIUS/ENCODE(0000001B):Orig. component type = Exec
*Sep 2 00:48:06.399: RADIUS(0000001B): Config NAS IP: 172.16.1.130
*Sep 2 00:48:06.400: RADIUS(0000001B): Config NAS IPv6: ::
*Sep 2 00:48:06.401: RADIUS/ENCODE(0000001B): acct_session_id: 15
*Sep 2 00:48:06.402: RADIUS(0000001B): sending
*Sep 2 00:48:06.410: RADIUS(0000001B): Send Access-Request to 172.16.1.230:1645 id 1645/14, len 78
*Sep 2 00:48:06.411: RADIUS: authenticator C4 A4 54 45 A9 43 1F 9E – D5 54 B8 D0 63 4D 52 96
*Sep 2 00:48:06.412: RADIUS: User-Name [1] 8 “admin1”
*Sep 2 00:48:06.413: RADIUS: User-Password [2] 18 *
*Sep 2 00:48:06.415: RADIUS: NAS-Port [5] 6 578
*Sep 2 00:48:06.417: RADIUS: NAS-Port-Id [87] 8 “tty578”
*Sep 2 00:48:06.419: RADIUS: NAS-Port-Type [61] 6 Virtual [5]
*Sep 2 00:48:06.420: RADIUS: Service-Type [6] 6 Login [1]
*Sep 2 00:48:06.422: RADIUS: NAS-IP-Address [4] 6 172.16.1.130
*Sep 2 00:48:06.424: RADIUS(0000001B): Sending a IPv4 Radius Packet
*Sep 2 00:48:06.427: RADIUS(0000001B): Started 5 sec timeout
*Sep 2 00:48:06.557: RADIUS: Received from id 1645/14 172.16.1.230:1645, Access-Accept, len 128
*Sep 2 00:48:06.559: RADIUS: authenticator F3 72 C9 23 C5 53 FA 2E – E2 EE 00 FF D6 6D 78 07
*Sep 2 00:48:06.560: RADIUS: User-Name [1] 8 “admin1”
*Sep 2 00:48:06.562: RADIUS: Class [25] 81
*Sep 2 00:48:06.562: RADIUS: 43 41 43 53 3A 61 63 31 30 30 31 65 36 64 4C 66 [CACS:ac1001e6dLf]
*Sep 2 00:48:06.563: RADIUS: 6B 52 61 39 47 6A 4E 4B 32 72 63 63 77 79 56 34 [kRa9GjNK2rccwyV4]
*Sep 2 00:48:06.564: RADIUS: 4F 37 32 34 39 36 6B 54 78 6C 6A 4C 55 67 74 4C [O72496kTxljLUgtL]
*Sep 2 00:48:06.565: RADIUS: 4D 45 77 59 2F 55 68 6F 3A 69 73 65 32 36 2D 30 [MEwY/Uho:ise26-0]
*Sep 2 00:48:06.566: RADIUS: 31 2F 33 35 36 37 33 31 37 31 39 2F 32 34 34 [ 1/356731719/244]
*Sep 2 00:48:06.567: RADIUS: Vendor, Cisco [26] 19
*Sep 2 00:48:06.568: RADIUS: Cisco AVpair [1] 13 “priv-lvl=15”
*Sep 2 00:48:06.570: RADIUS(0000001B): Received from id 1645/14
This wraps up this Privilege Level 15 with Cisco ISE post. I hope you enjoyed it, and as always, I would love to hear your feedback. Thanks for reading!
Share via: