As we know the Cisco ASA supports DHCP server feature but not the DNS server. The reason behind this would be to have less services running on the appliance that would expose any potential vulnerabilities that would be exploited which would turn in successful threats, especially when the running services are interacting directly with the internet. In this post I will show you how to make a Cisco ASA acting as a DNS server.
A scenario where having a DNS server running on the ASA would be handy would be when the DHCP server is running on the same appliance, and where the DNS server in use would be a public DNS, but to be honest the fact that the ASA does not support the DNS server is not an issue at all, because you can still push an external DNS server IP address through the DHCP lease managed by the ASA.
However, let’s say hypothetically your requirement is to use the ASA as you DNS server for the hosts located on your internal segment, would that be possible? the answer is yes & no. Although the ASA will never be acting as a real DNS server, you can still apply a little trick with NAT that would make the ASA to result as your hosts DNS server.
From the hosts perspective they would think that the DNS server is the ASA, however, in reality the ASA would be just acting as a transporter of DNS requests between the internal hosts and the external public DNS server, in this case we are using Google DNS 8.8.8.8 on the ASA. Here is the trick of how you can accomplish this.
TOPOLOGY
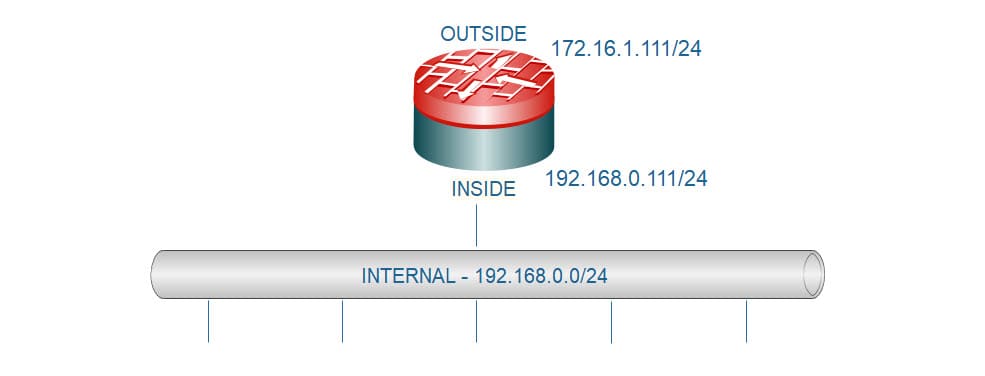
Let’s get started with the basic configuration of the DHCP server on the ASA. The DHCP services are running on the inside interface to provide leases to the internal segment out of the inside interface only:
dhcpd address 192.168.0.10-192.168.0.20 inside
dhcpd dns 192.168.0.111 interface inside
dhcpd enable inside
Now let’s create a network object to define the internal subnet 192.168.0.0/24 and then apply the basic PAT rule for internet connectivity. All the internal hosts private IP addresses will be translated to the ASA outside interface IP address 172.16.1.111:
object network LAN-192.168.0.0
subnet 192.168.0.0 255.255.255.0
nat (inside,outside) dynamic interface
Here is a quick check to ensure clients can get an IP address from the ASA:

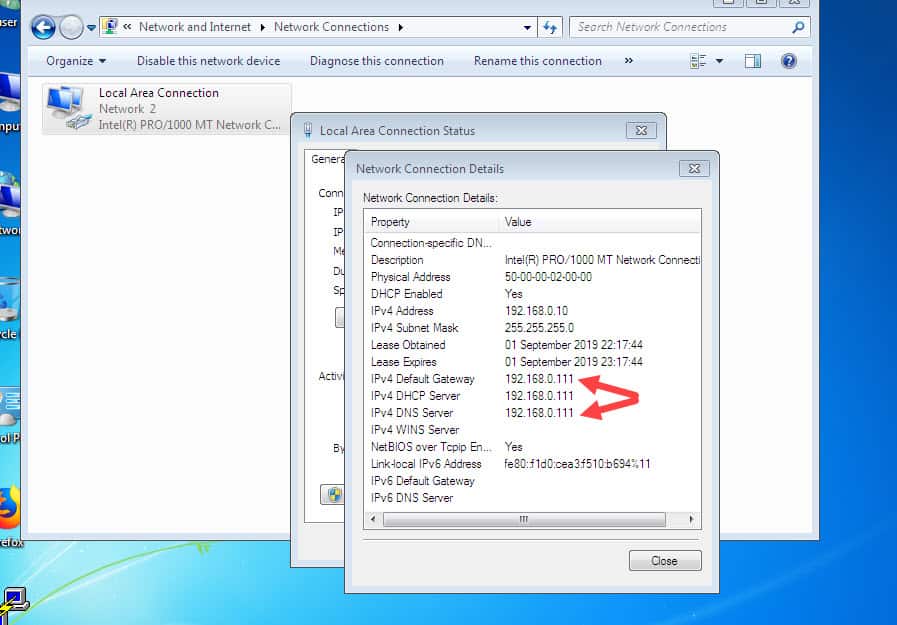
As you can see the ASA DHCP server is configured to push its inside interface IP address as the default gateway and the DNS server. Let’s check if DNS works from the client:
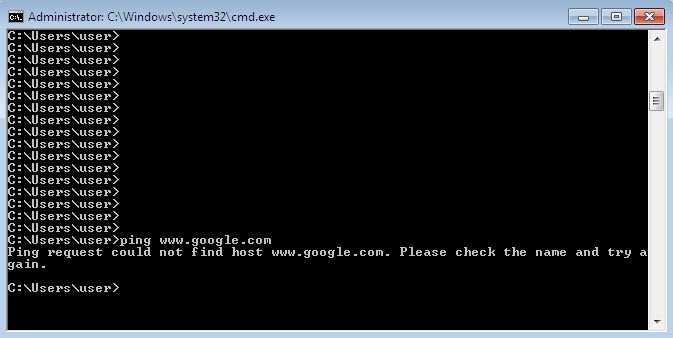
The reason why is not working is because right now the client is sending its DNS queries to the ASA, the ASA just drops them when it receives them, here is what the ASA logs show:
%ASA-7-710005: UDP request discarded from 192.168.0.10/57666 to inside:192.168.0.111/53
%ASA-7-710005: UDP request discarded from 192.168.0.10/57666 to inside:192.168.0.111/53
%ASA-7-710005: UDP request discarded from 192.168.0.10/57666 to inside:192.168.0.111/53
Now let’s add the NAT rule that will fix this issue for us. We will be using Google DNS as our public DNS server. The NAT rule will untranslate any returning traffic from Google DNS IP address 8.8.8.8 on port 53/udp on the ASA outside interface to be the IP address of the ASA inside interface which is 192.168.0.111. Similar to what we have done above we need to create a network object and then applying the NAT rule inside of the object, the difference with this one is that we need to define the ports, and we also need to revert the order of the mapped and the unmapped interfaces:
object network Google-DNS
host 8.8.8.8
nat (outside,inside) static interface service udp 53 53
Now let’s try again to ping a couple of websites from the client 192.168.0.10 and see if it works:
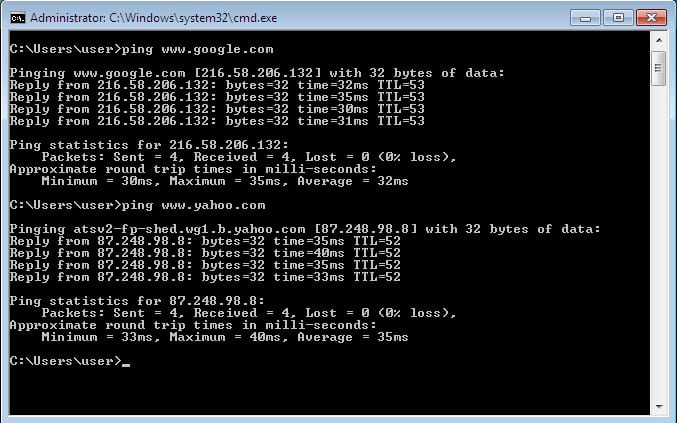
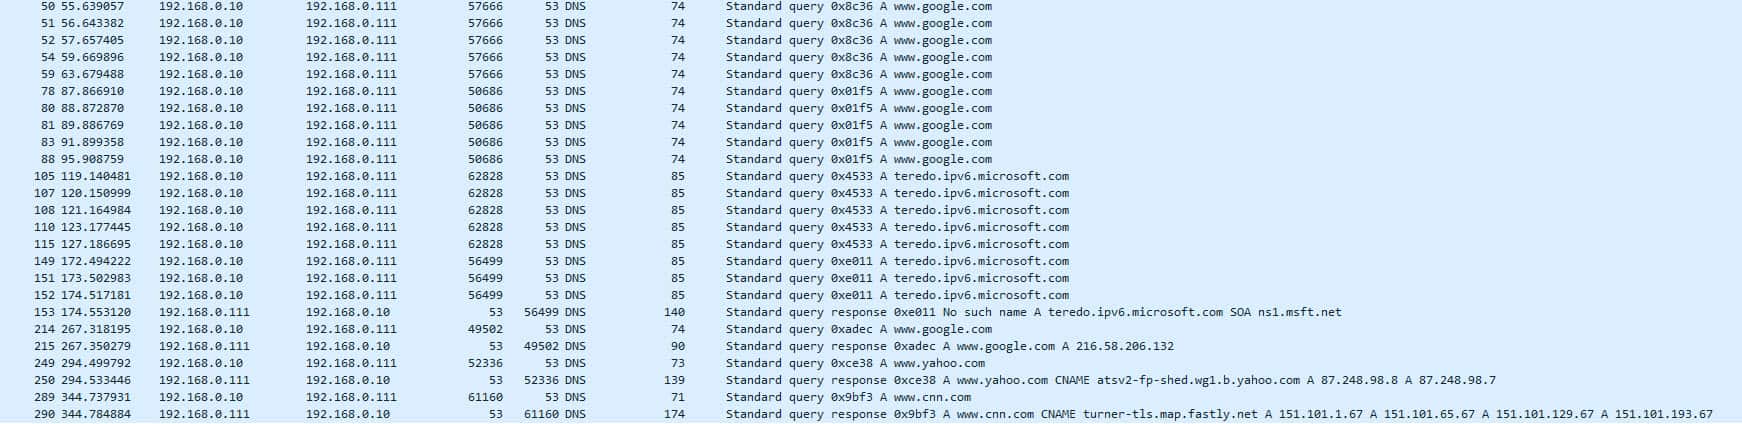
As you can see, now DNS traffic is successfully exchanged between the client and the ASA. From the client perspective, its DNS server is the ASA inside interface IP address 192.168.0.111, but in the background the ASA relays all the DNS requests to Google DNS, and when Google DNS replies back, the last NAT rule we added changes Google DNS IP address 8.8.8.8 to be 192.168.0.111, and finally the ASA routes the DNS traffic back to the client. Here is some packet capture of the DNS traffic sent by the client, before and after we added the NAT rule:
Here we can check the hits on the NAT rule we added:
ASA# sh nat detail
Auto NAT Policies (Section 2)
1 (outside) to (inside) source static Google-DNS interface service udp domain domain
translate_hits = 0, untranslate_hits = 11
Source – Origin: 8.8.8.8/32, Translated: 192.168.0.111/24
Service – Protocol: udp Real: domain Mapped: domain
And here how we can see that the ASA is building up the DNS connections to Google DNS on behalf of the client:
%ASA-7-609001: Built local-host outside:8.8.8.8
%ASA-6-302015: Built outbound UDP connection 63 for outside:8.8.8.8/53 (192.168.0.111/53) to inside:192.168.0.10/54279 (172.16.1.111/54279)
%ASA-6-305011: Built dynamic ICMP translation from inside:192.168.0.10/1 to outside:172.16.1.111/1
%ASA-7-609001: Built local-host outside:216.58.198.164
%ASA-6-302020: Built outbound ICMP connection for faddr 216.58.198.164/0 gaddr 172.16.1.111/1 laddr 192.168.0.10/1 type 8 code 0
%ASA-6-302016: Teardown UDP connection 63 for outside:8.8.8.8/53 to inside:192.168.0.10/54279 duration 0:00:00 bytes 80
%ASA-7-609002: Teardown local-host outside:8.8.8.8 duration 0:00:00
This wraps up this post about how to make Cisco ASA acting as a DNS server.
Thanks for reading!