In this post I will show you how to configure an IKEv1 site to site VPN on Cisco FMC. The FMC we are going to use in this lab is running version 6.6 in evaluation mode. However, with the older versions the process is pretty much the same.
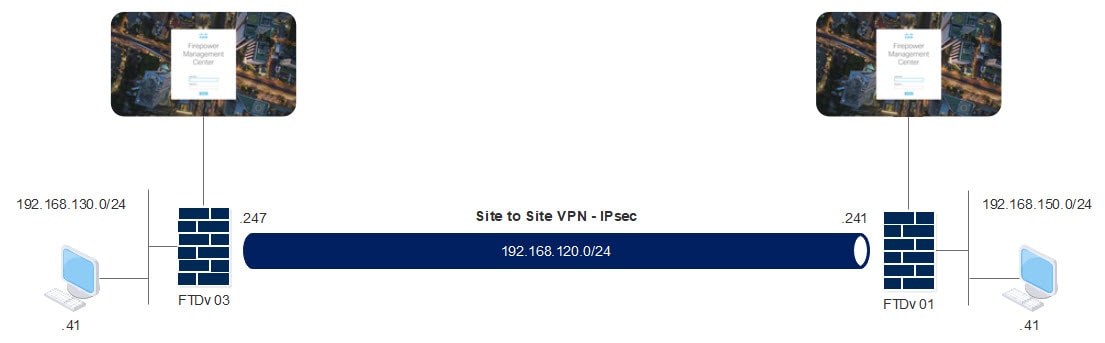
Our topology is very simple, we have two FTD appliances and two endpoints. Both FTD appliances are managed by FMC, however, each one is managed by a separate FMC. In this lab we are going to assume that the FTDv-01 appliance is ready to go, hence we will go through the FTDv-03 configuration only.
Topology
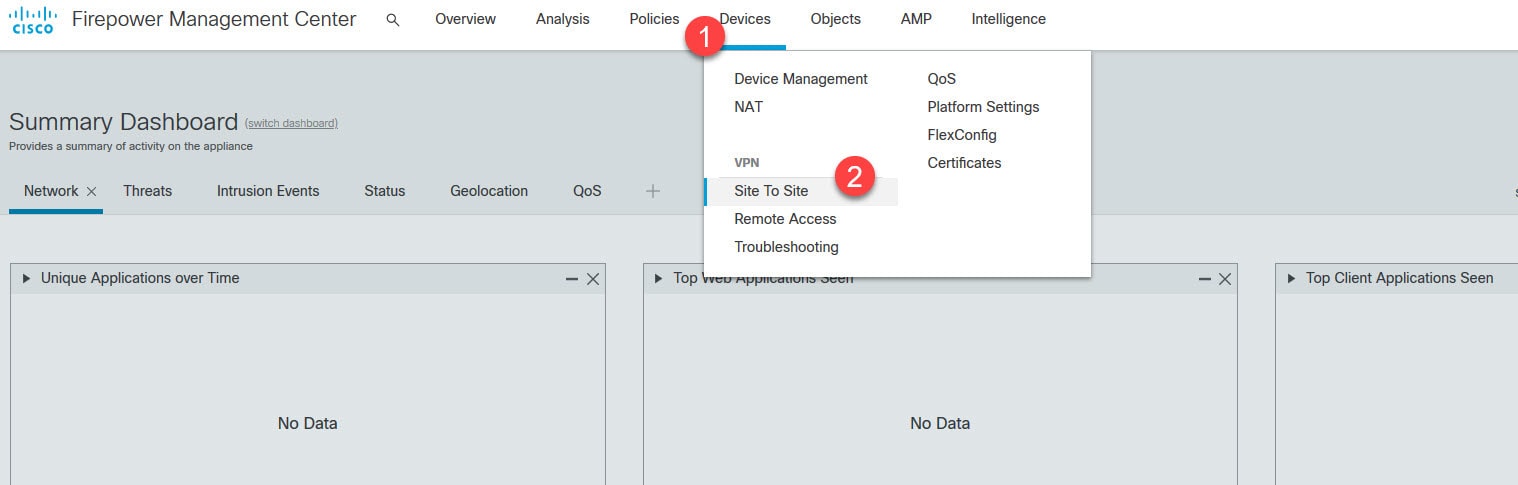
Log in to the FMC and go to Devices > VPN > Site To Site
Go to Add VPN > Firepower Threat Defense Device

You can also click on the Firepower Threat Defense Device link in the middle of the page which will take you to the same section.
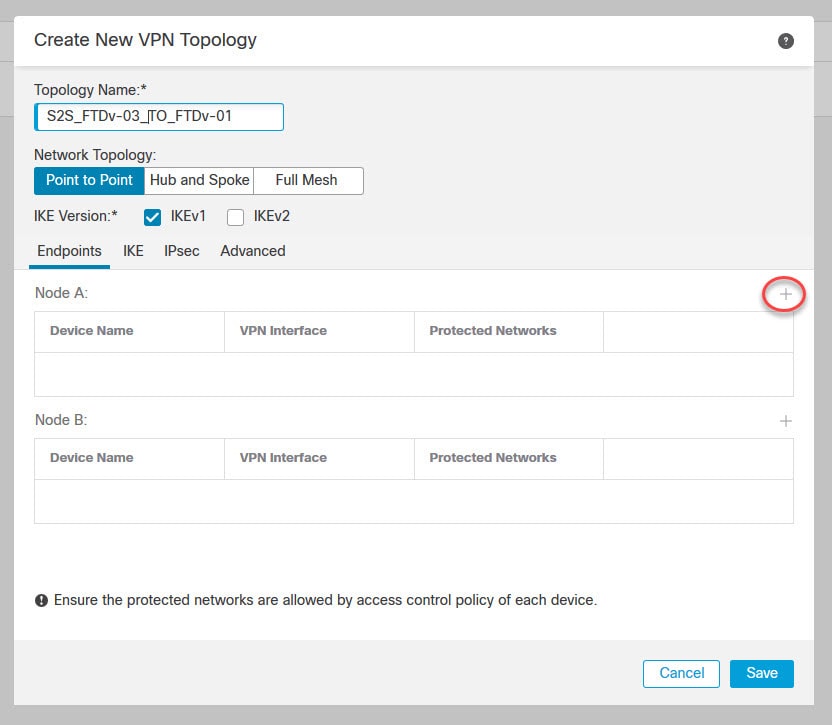
Create the site to site VPN topology
In this section we need to define all the setting related to the VPN tunnel with the exception for NAT exemption and the access security policy rules. Our access security policy is already allowing the VPN traffic from inside to outside, so we don’t need to do anything for that.
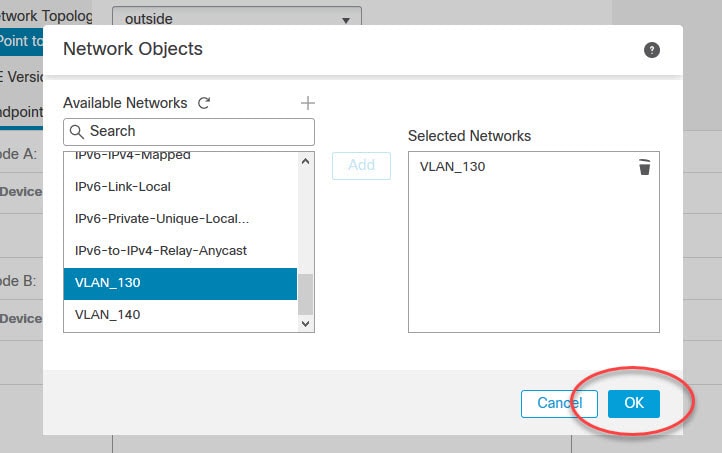
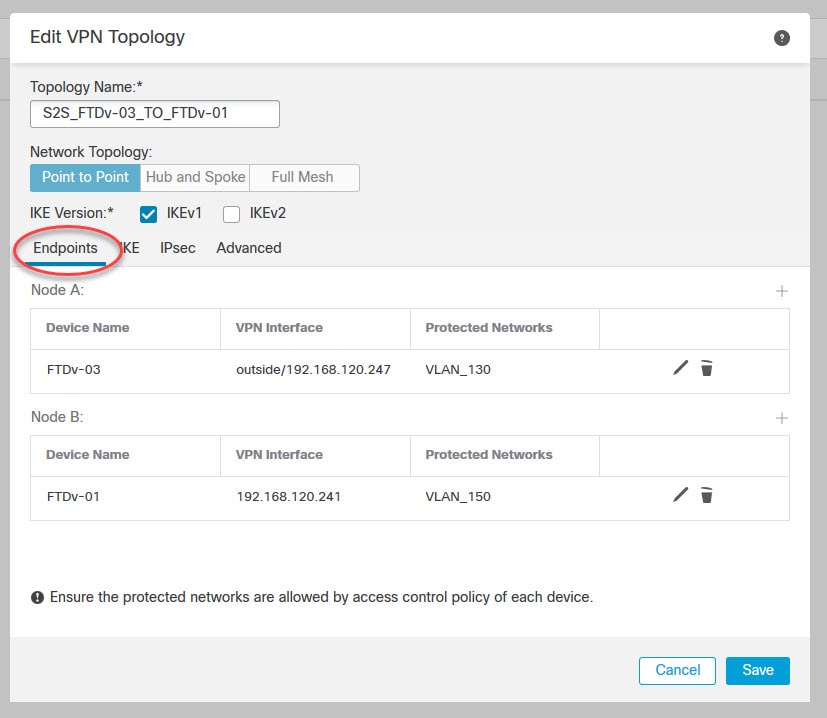
The protected networks are the subnets that you want to protect over the VPN tunnel. In other words they are the subnets that need to talk to each other over the VPN tunnel. Sometimes you see them called as the encryption domains.
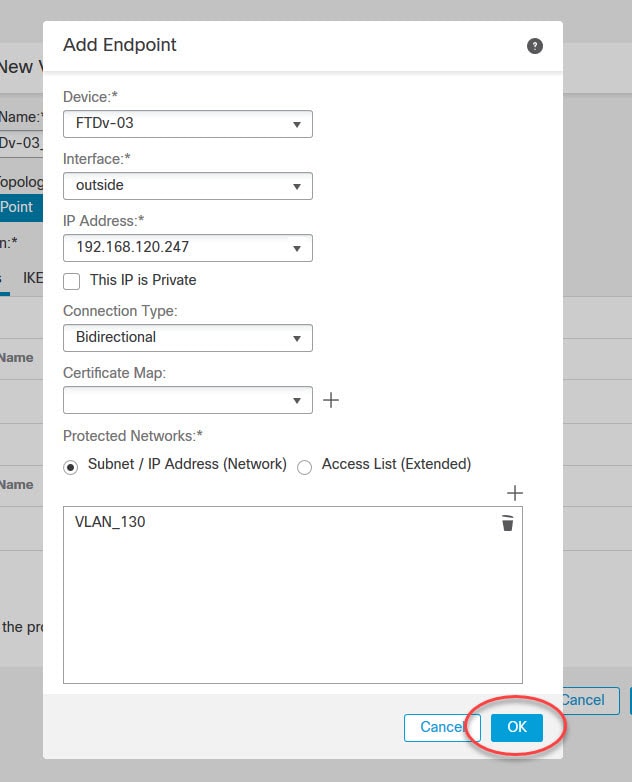
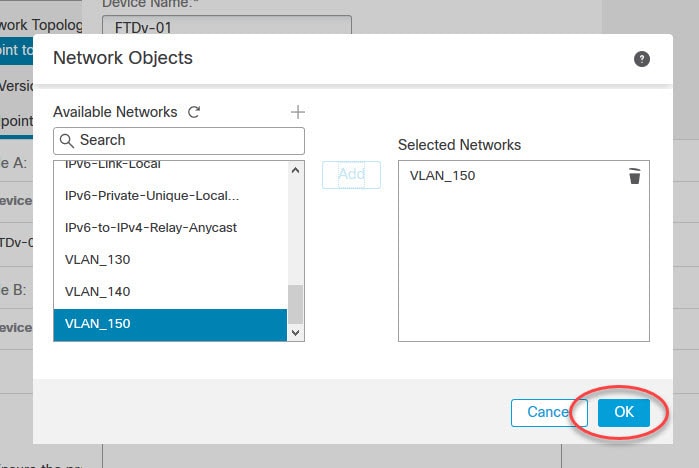
In our lab we have VLAN_130 object defined with the local subnet 192.168.130.0/24, and the object VLAN_150 with the remote local subnet 192.168.150.0/24.
Define the peers in the Endpoints tab
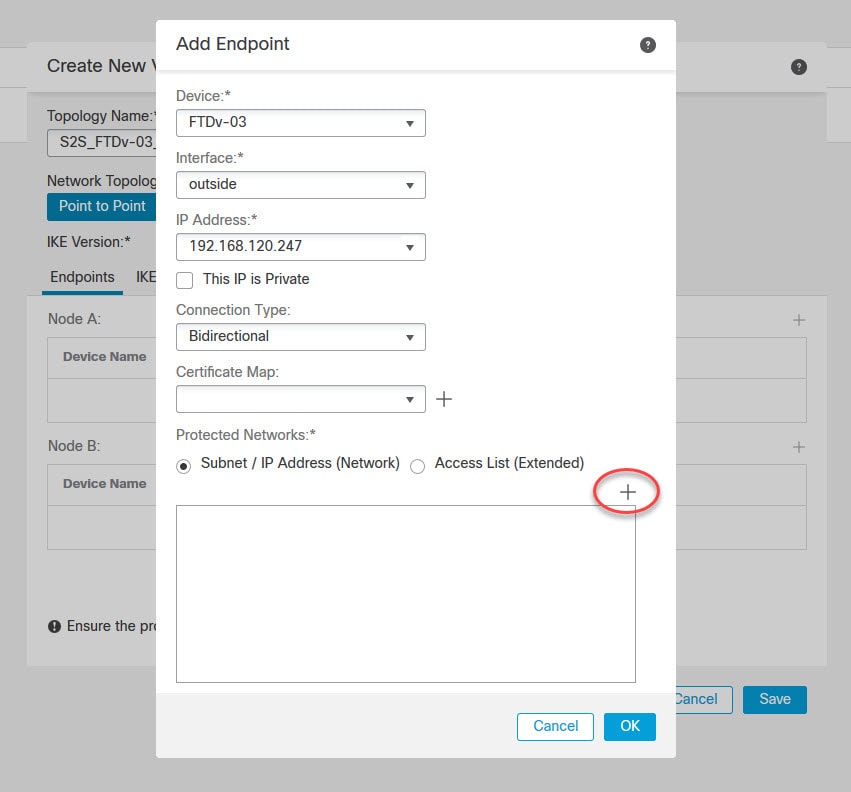
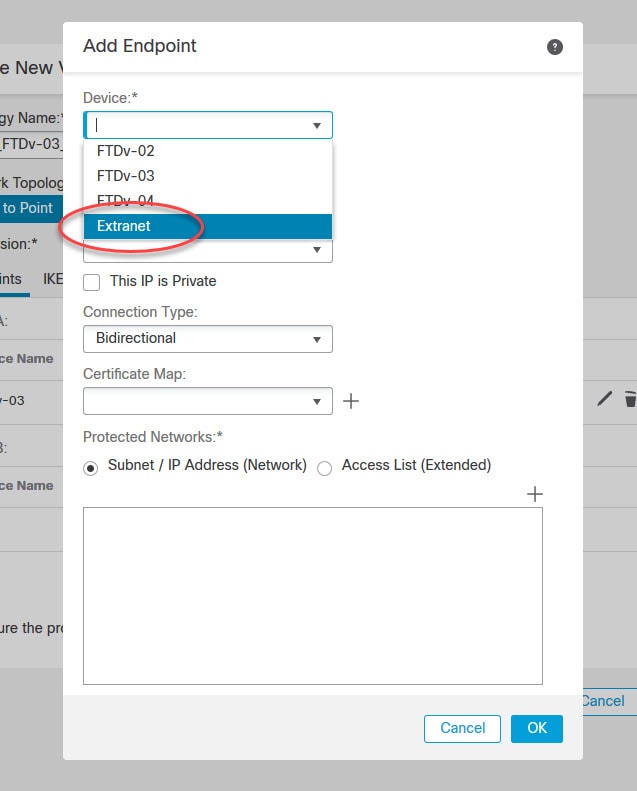
For the remote peer we have to select Extranet from the Device menu. That’s because the remote peer in this case is not managed by this FMC, so it won’t show up on the list.

Define Phase 1 settings in the IKE tab
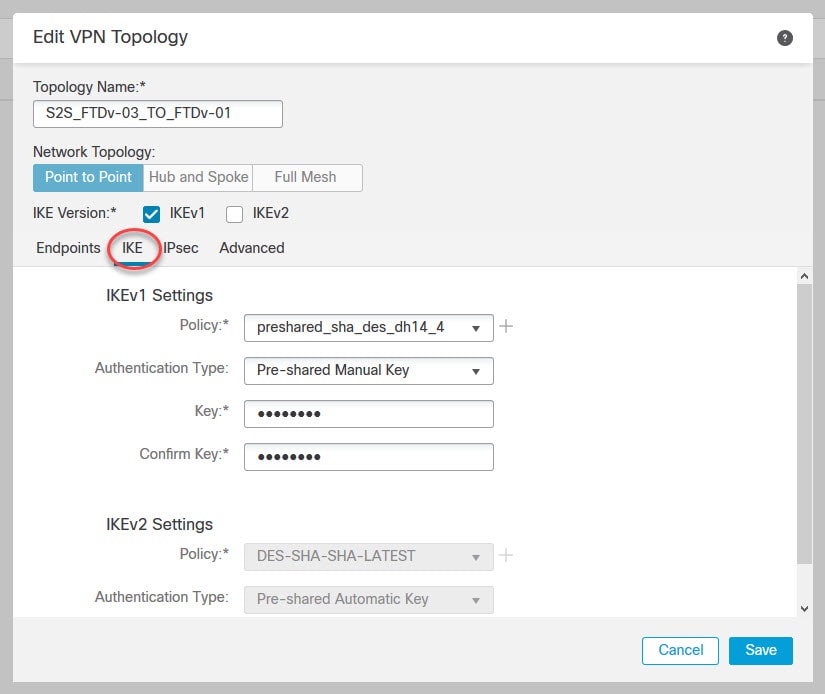
Don’t use DES or 3DES in production since these two encryption algorithms are very weak and no one would use them nowadays. FMC in evaluation mode does not allow using any AES algorithm, it will return an error when you try to deploy the changes.
Define Phase 2 settings in the IPsec tab

Don’t use DES or 3DES in production since these two encryption algorithms are very weak and no one would use them nowadays. FMC in evaluation mode does not allow using any AES algorithm, it will return an error when you try to deploy the changes.
Enable Access Control for VPN Traffic in the Advanced tab
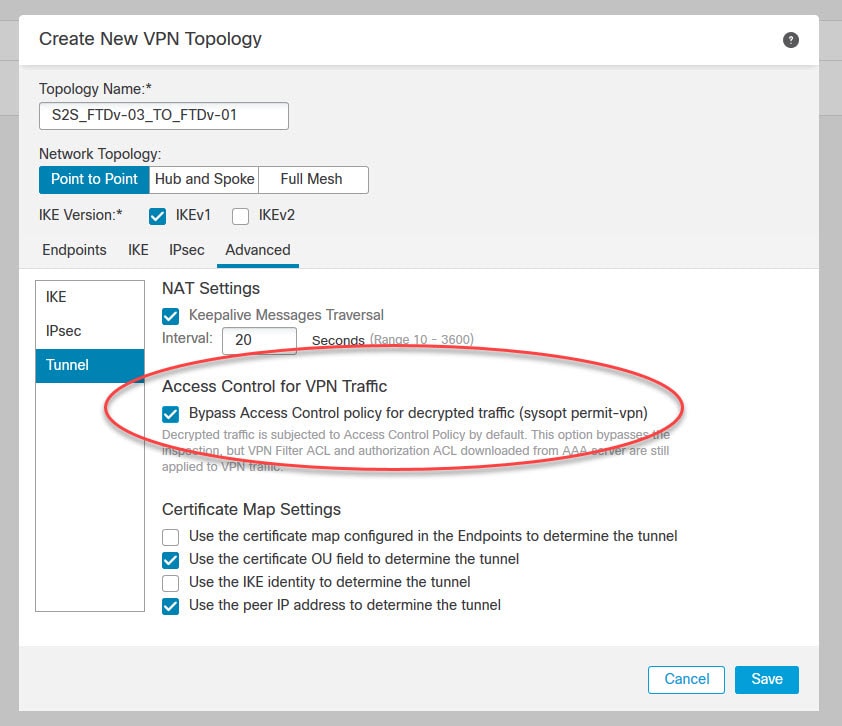
When the Access Control for VPN Traffic option is ticked it will allow the VPN traffic on the FTD appliance outside interface to bypass all the security checks. Therefore, in production environment you should configure some VPN filtering rather than allowing all the incoming traffic from the remote subnet 192.168.150.0/24 to access your entire subnet 192.168.130.0/24.
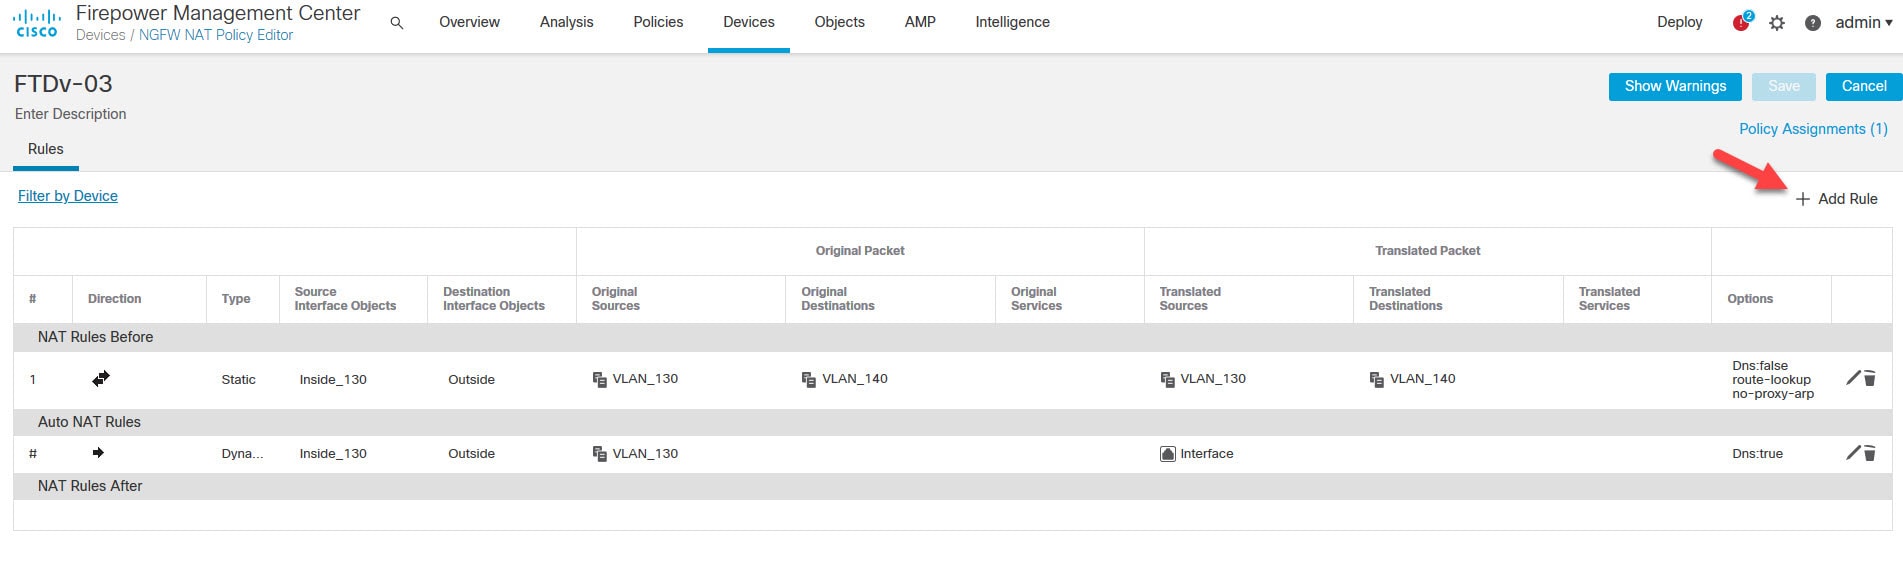
Go to Devices > NAT to edit the NAT policy
We need to create a NAT exemption rule to keep the source and destination IP addressing the same for the VPN traffic.

Edit the NAT policy by clicking the pencil icon

Click on Add Rule to add the NAT exemption rule
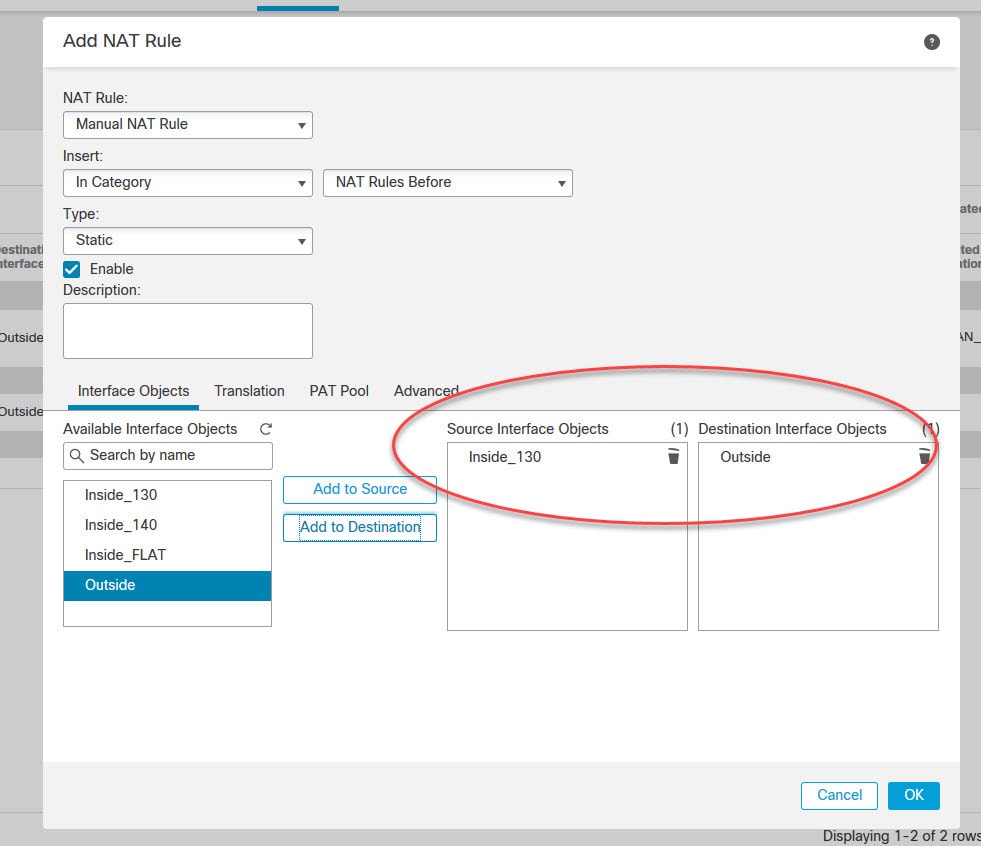
From the top section select Manual NAT Rule and then select the inside and the outside interfaces in the Interface Objects tab.
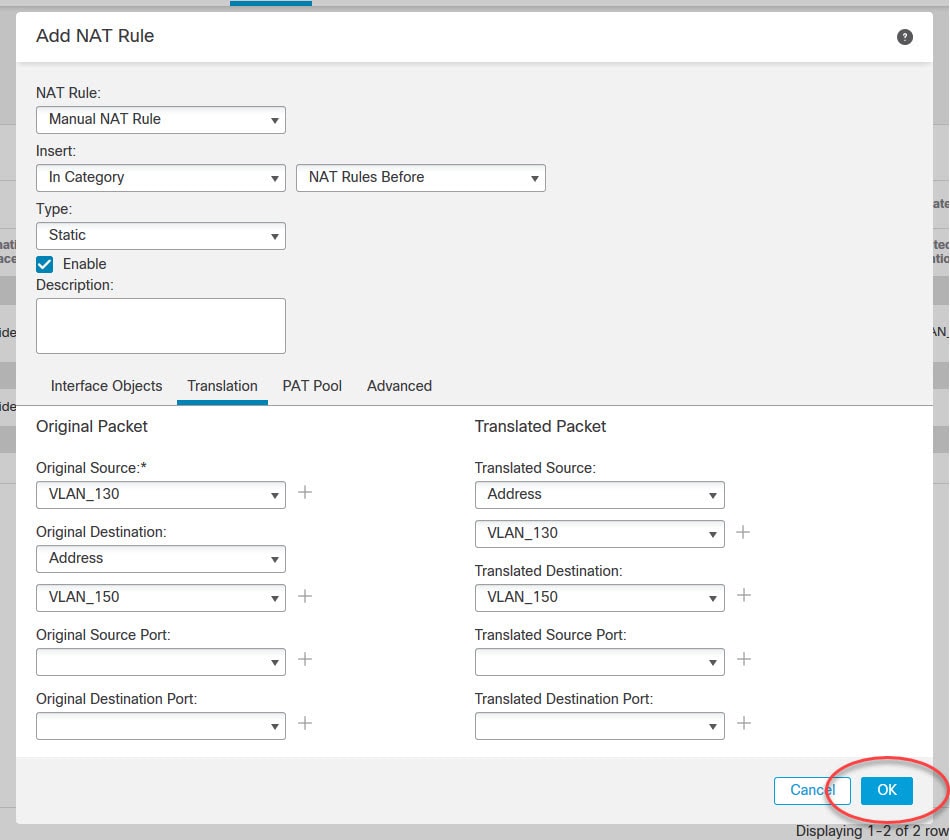
Go to Translation tab and select the source and destination subnets
In this tab we need to define the translation rule. There are two sections here, one for the source traffic and another for the destination. Because we want to exempt NAT for the VPN traffic, we must select the local subnet 192.168.130.0/24 as the Original Source and Translated Source. Similar for the remote subnet 192.168.150.0/24.
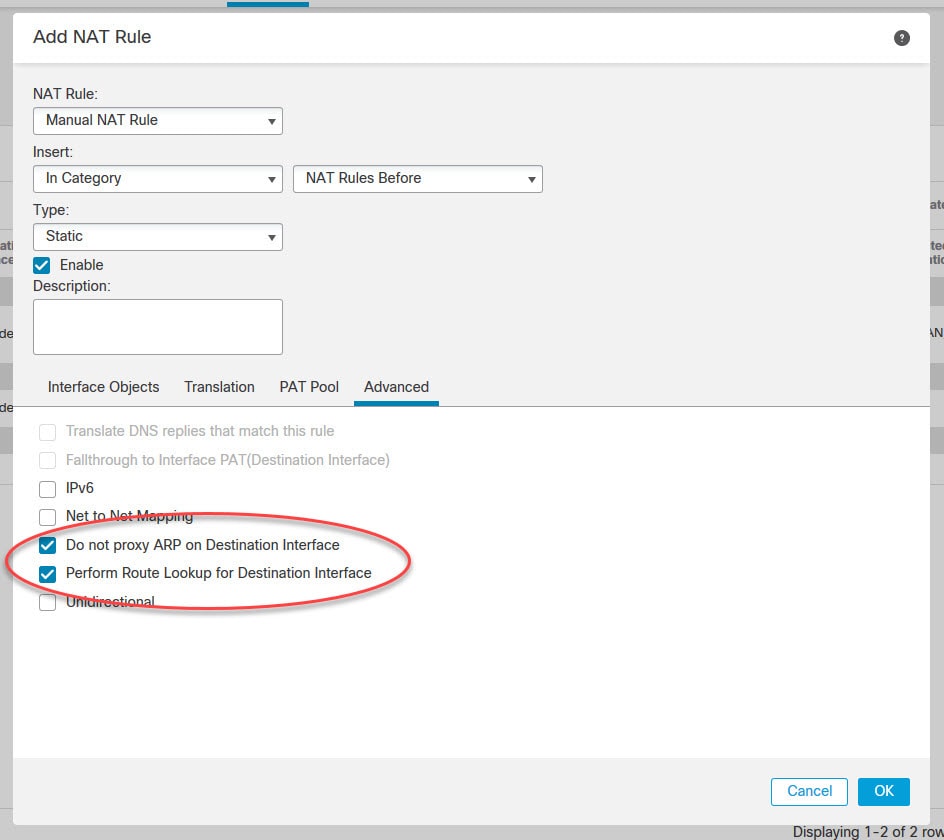
Go to Advanced tab and select the two options below to enable route lookup and to disable proxy ARP for this NAT rule, and then click OK
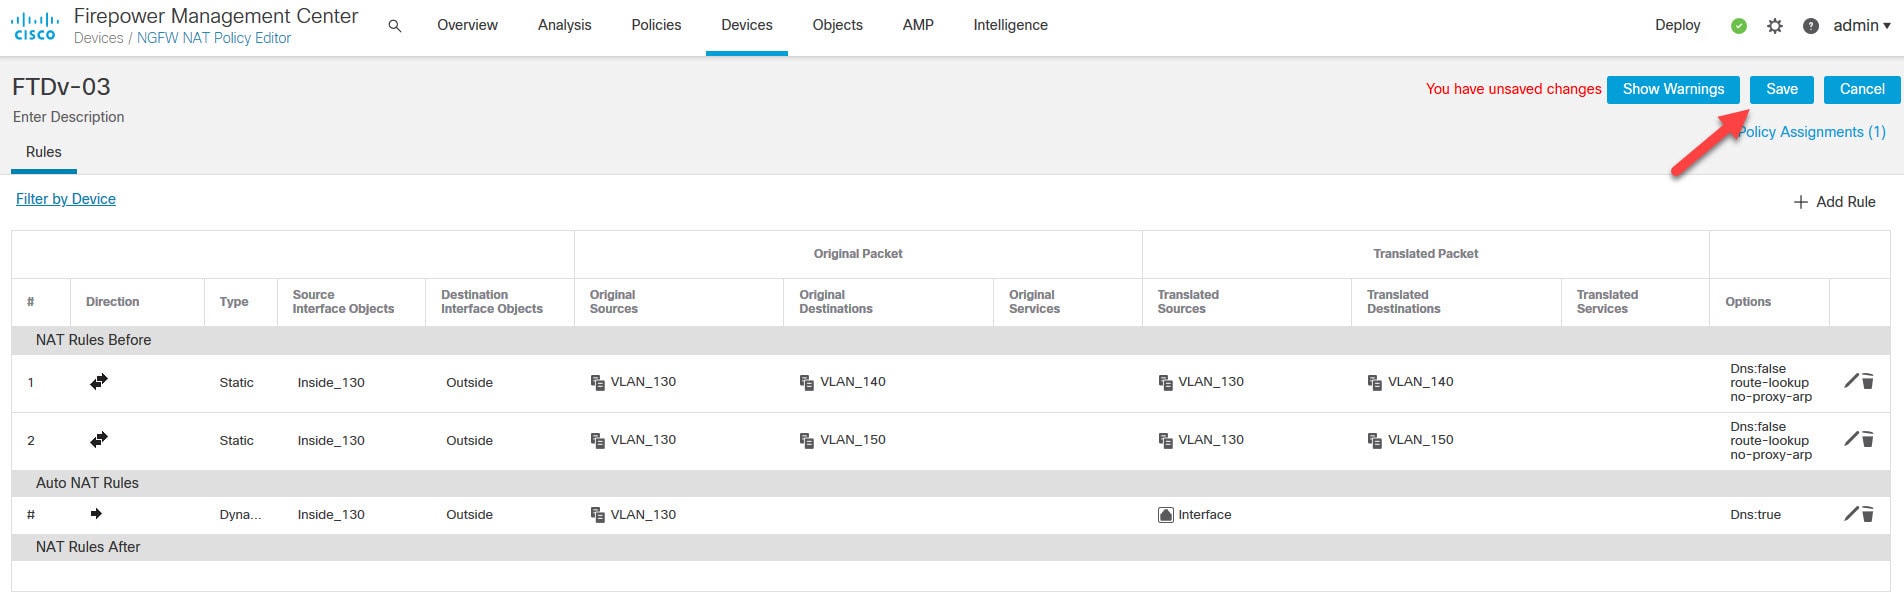
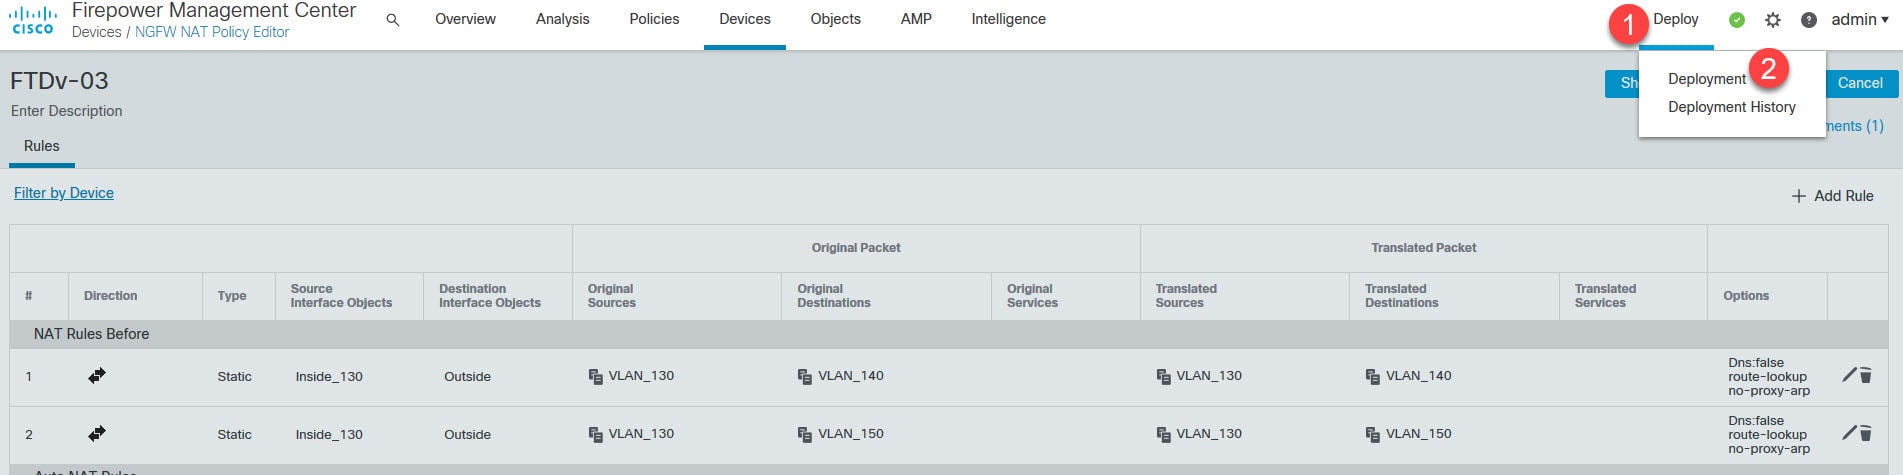
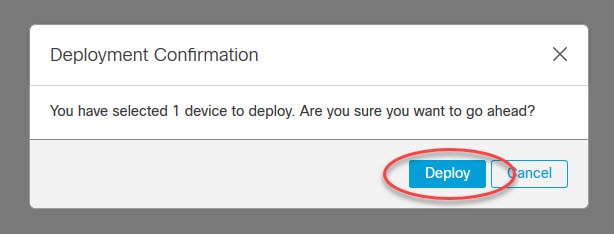
Save the NAT policy and deploy the changes

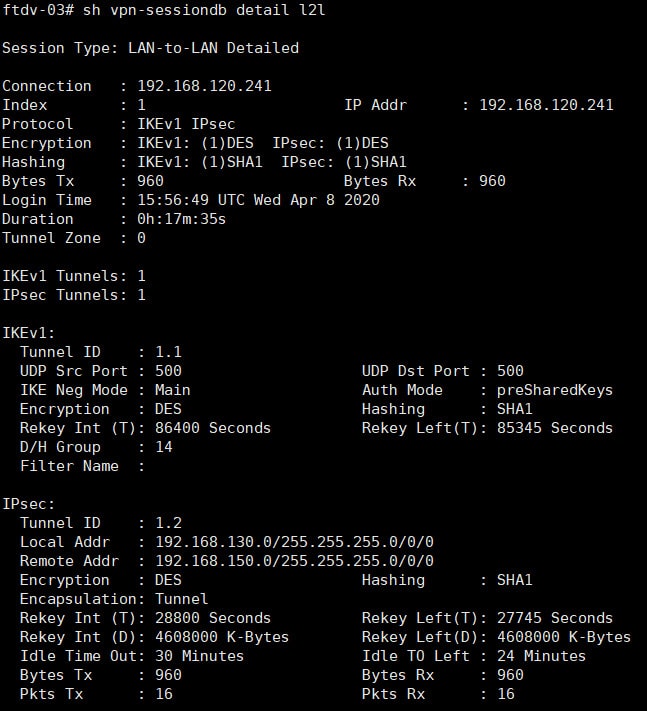
Testing
After initiating some traffic between the endpoints we can see that the VPN tunnel came up successfully and the traffic has been successfully delivered to each endpoint.


This wraps up this post about Cisco FMC site to site VPN.
Thank you for reading!
Such a great write up!
Very well done!
It is already helping a lot!
Continue the great job!
Cheers!