In this post, I am going to show you how creating multiple admin accounts on FDM for GUI accesses can be possible by using some tools you would most likely have in your environment. First, as we know Firepower Device Management (FDM) does not support creating multiple admin accounts for FDM GUI accesses. This is a known limitation and as a result it would mean that all the admins will use the same admin account to log into the FTD. Of course this would lead to share the admin account credentials between the admins which could potentially breach our security.
Creating multiple admin accounts for CLI is a bit different since CLI on FTD allows creating multiple admin accounts. Therefore, we can create a dedicated CLI account for each admin. However, those accounts will only be valid for CLI accesses, not for GUI. The only exception of this is the default admin account which can interact with both CLI and GUI.
SOLUTION
By relying on an external authC and authZ server as well as the AD we can achieve creating multiple admin accounts for FDM. The external authC and authZ server does not necessarily have to be Cisco ISE. It can be any RADIUS server. In other words, it could be the AD itself with the NPS feature installed or any open source RADIUS server.
Now, if we have those tools in our environment that would allow us to workaround this limitation why not using them?!. To do so, we need to rely on an external authentication (authC) and authorization (authZ) server. Also, we need to rely on our AD to check against the interested AD group where the admin users would be located.
The end result would be allowing a centralized management accesses through FDM via an external authC and authZ server for HTTPS protocols, and also managing the SSH accesses at the same time. These accesses will only be granted if a user exists in a specific AD group.
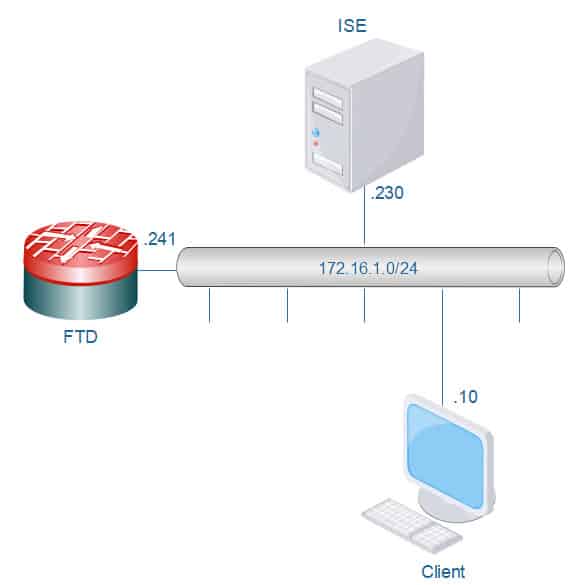
In addition, we will create a read only HTTPS access profile. ISE is going to be our external RADIUS server which is already joined to our AD. Our topology is simple, we have our ISE RADIUS server, an FTD appliance and our client machine. All these devices are located in the same broadcast domain.
TOPOLOGY
ISE AUTHZ PROFILES
Let’s start with applying the configuration on ISE. This requires creating a couple of authZ profiles and a policy set. One authZ profile will be used for SSH accesses and another for HTTPS accesses. The authZ profiles will be responsible to return a specific RADIUS attribute to the NAD based on the matched rule. The access level that will be granted will be based on the received attributes. Our FTD appliance is already added to ISE as a network device.
ISE SSH AUTHZ PROFILE
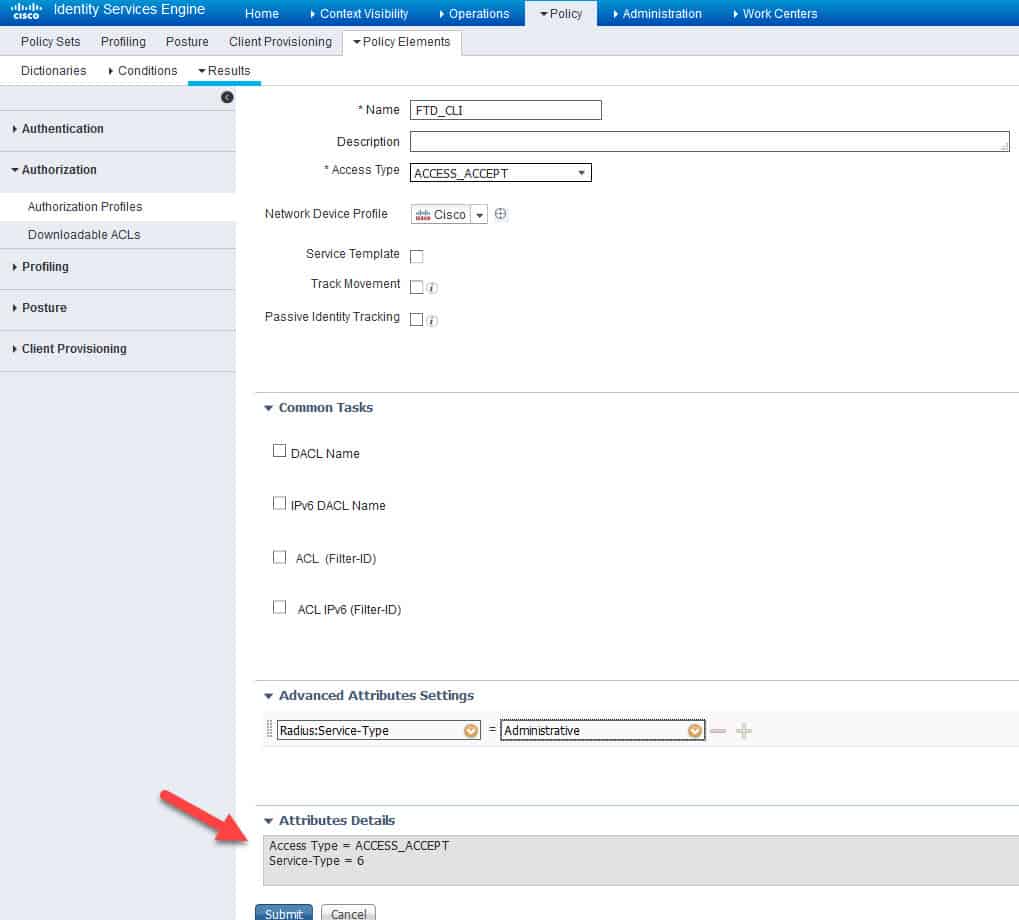
First, we will start with the SSH profile, we will call it FTD_CLI. In this profile we will configure the RADIUS Service Type with Administrative as a value. This will allow the FTD to associate an admin access level to the session that is matching the policy set on ISE where this authZ is applied.
At the bottom of the authZ profile page in the Advanced Attributes Settings section click on the yellow little circle next to Select an item, scroll down and click on Radius:
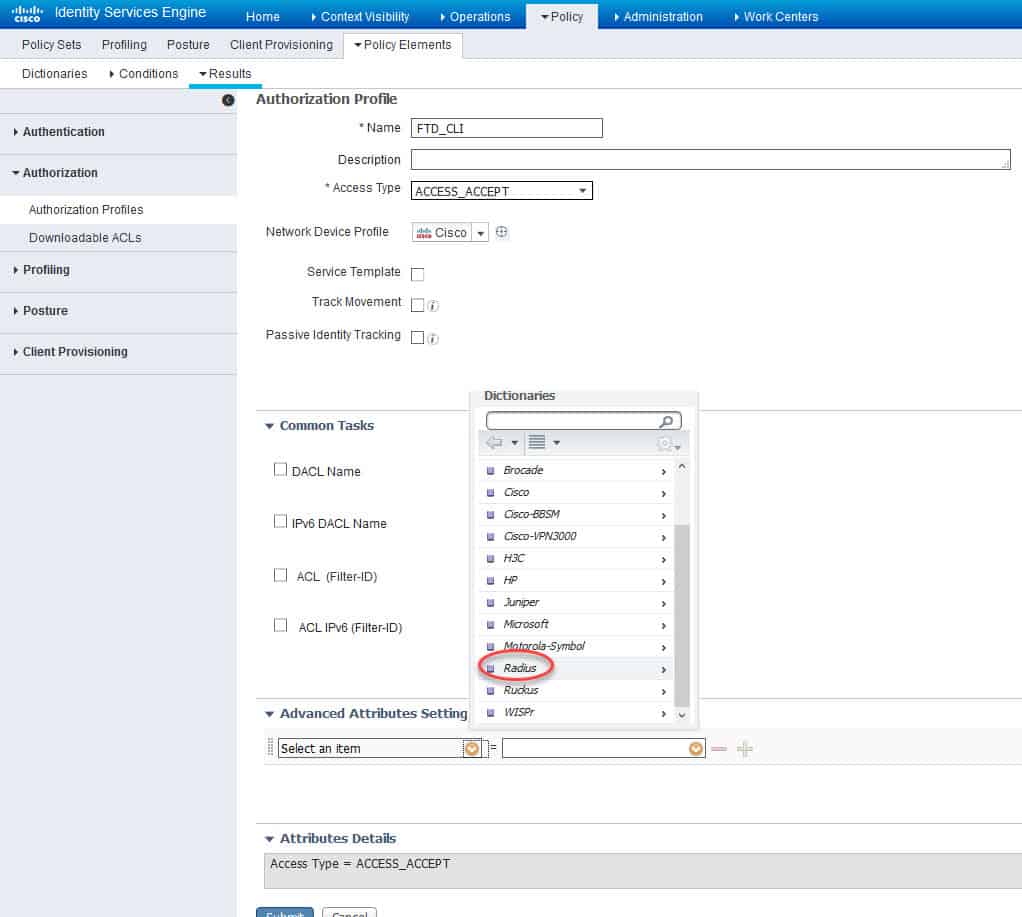
Now from the RADIUS types list scroll down and click on Service-Type–[6]:
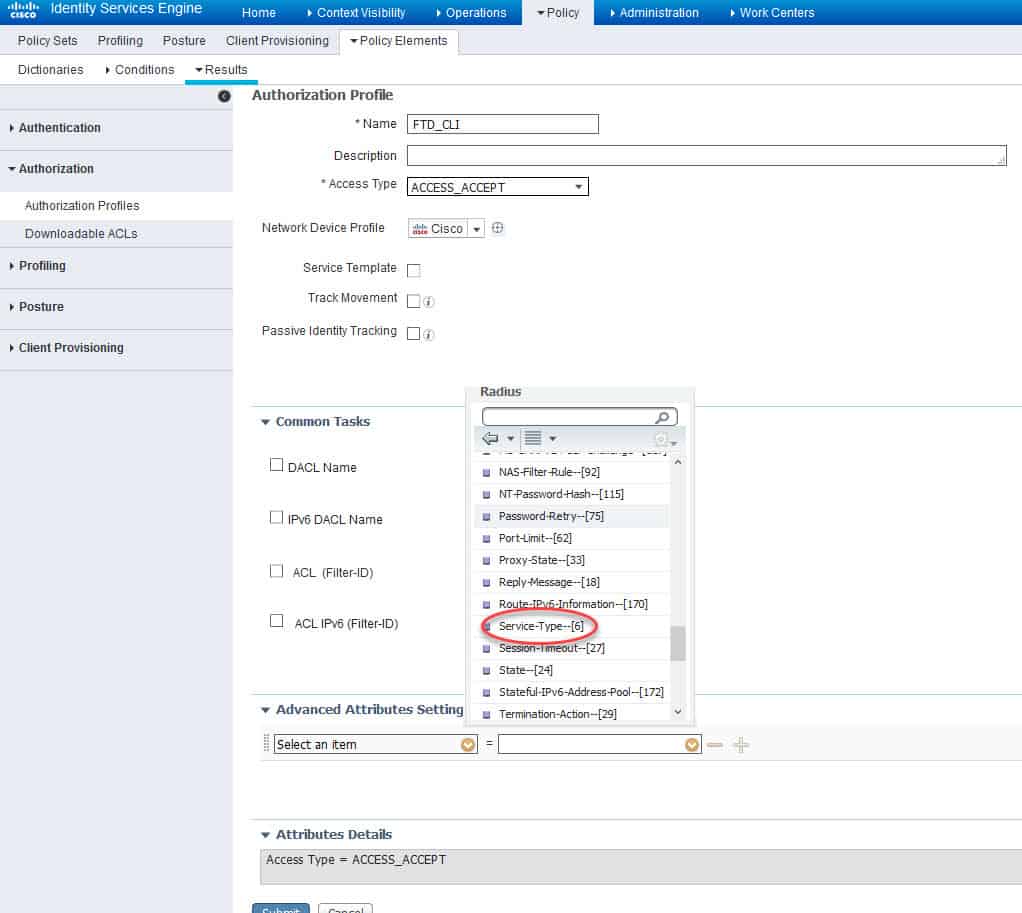
Now we need to click on the yellow little circle next to the empty filed and select Administrative as a RADIUS attribute value:
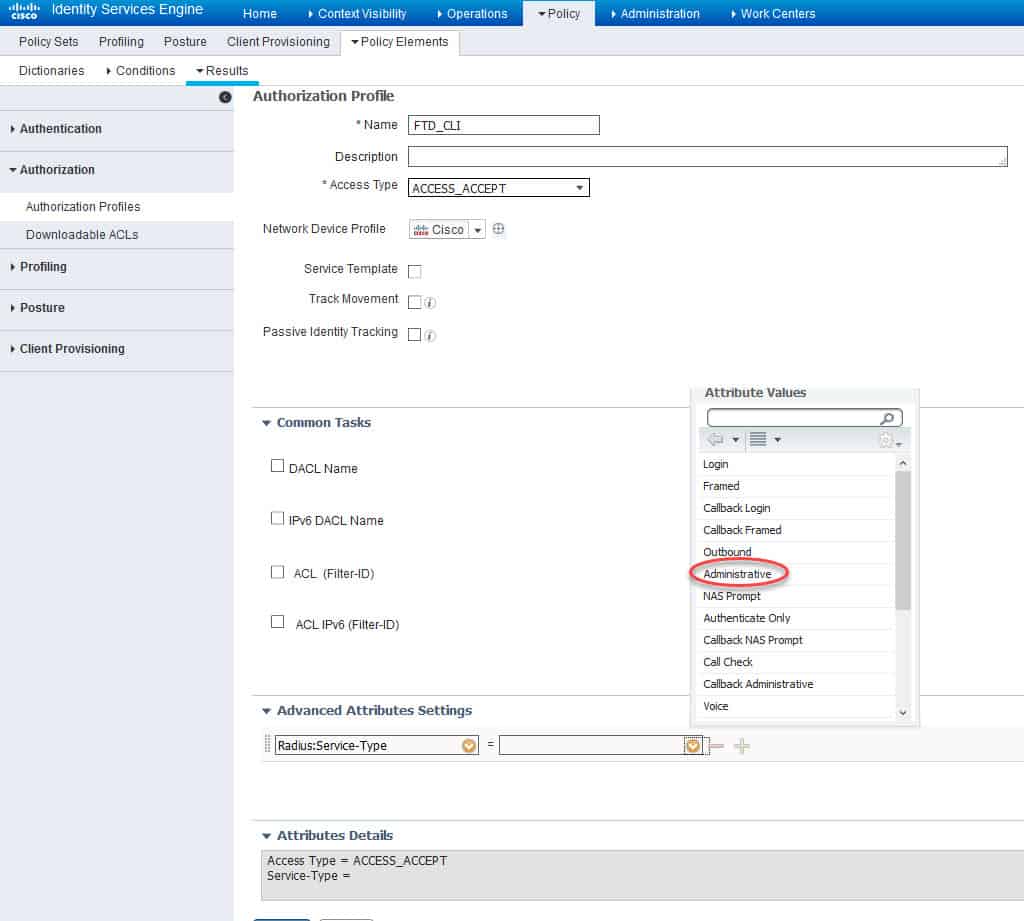
Let’s verify what we have in the Attributes Details section and finally click on Submit to save:
ISE HTTPS AUTHZ PROFILE
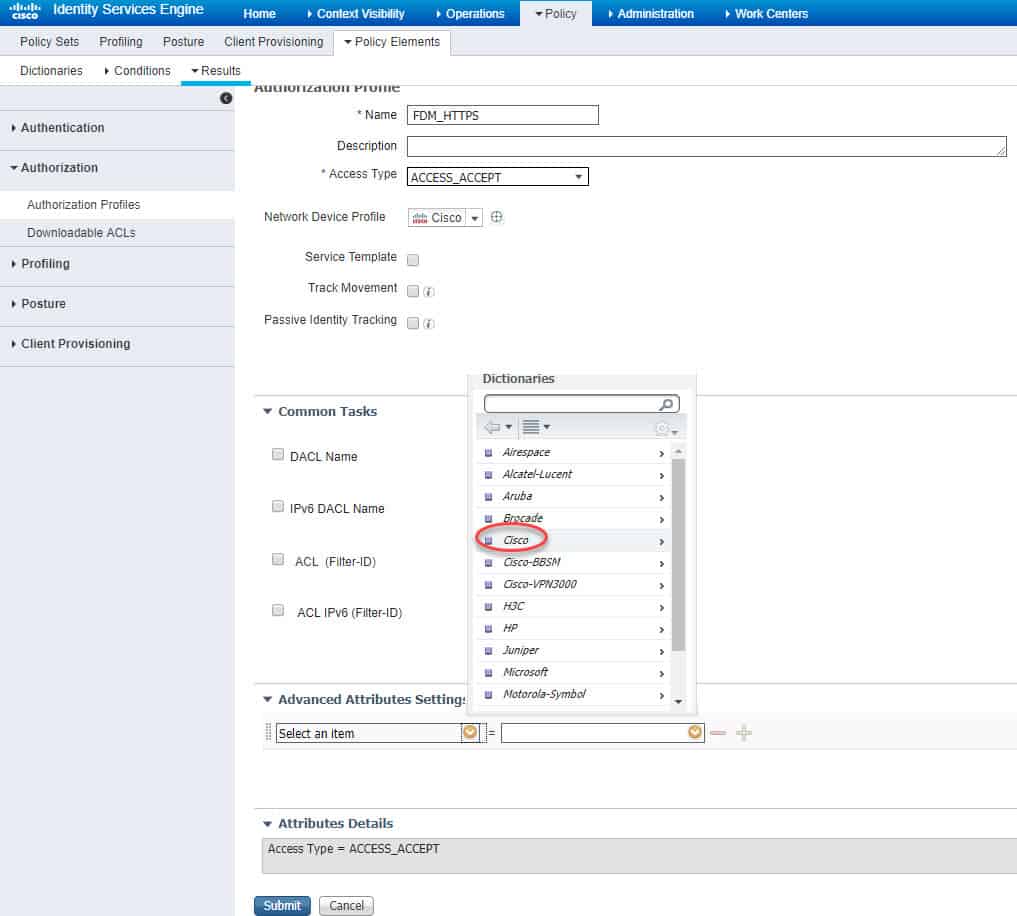
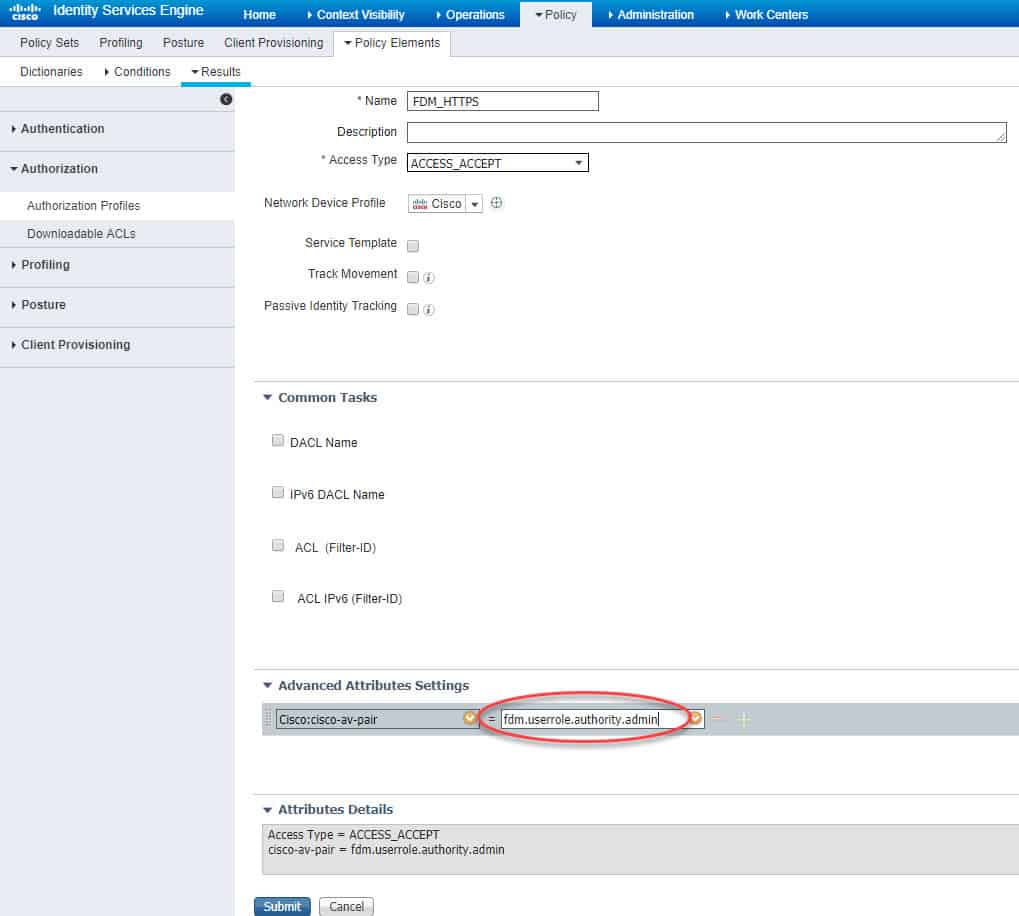
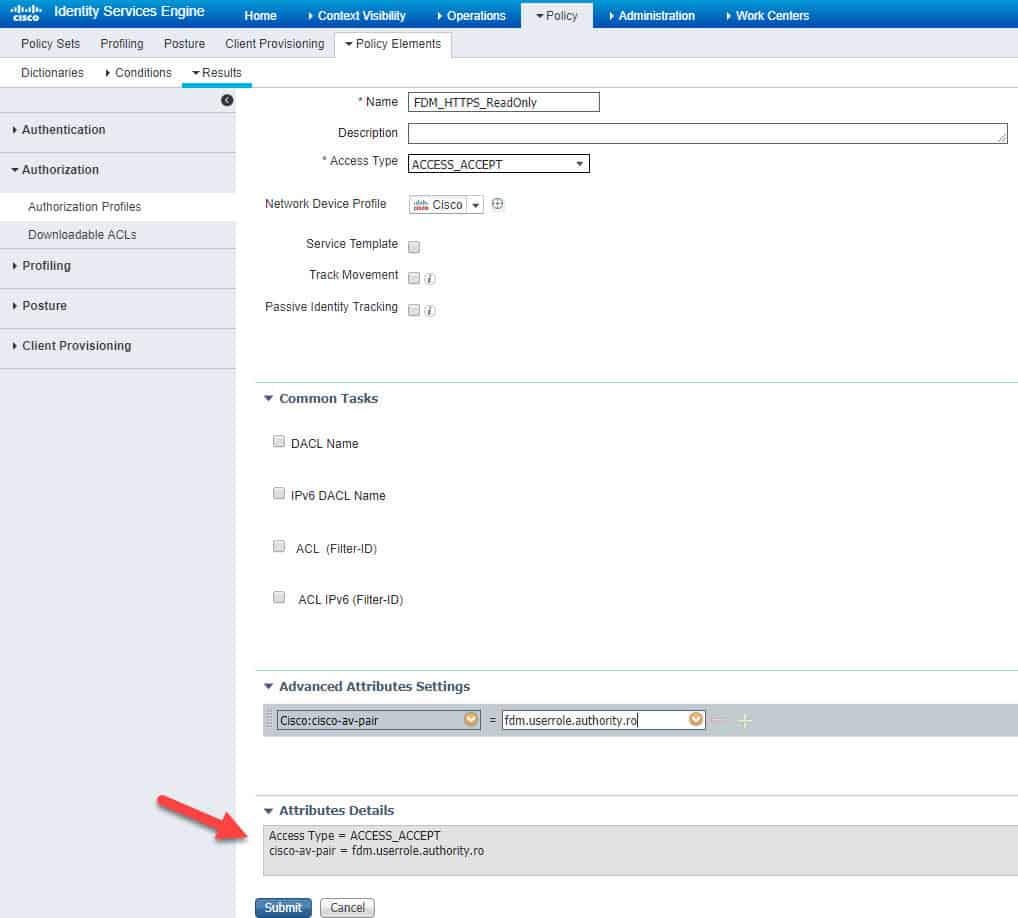
Similarly, we need to create the second authZ profile for HTTPS accesses. However, in this profile we are going to use Cisco AV Pair instead of RADIUS. The value we are going to set is fdm.userrole.authority.admin.
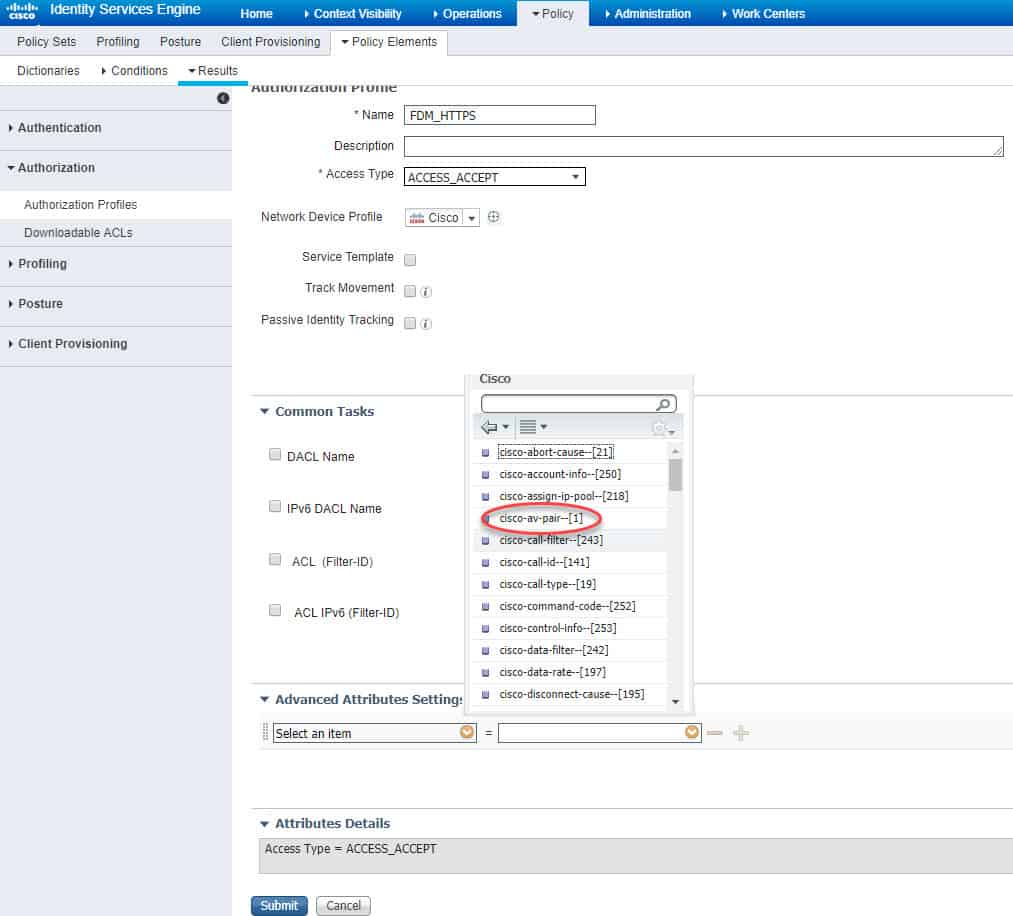
This value will allow the FDM to grant a full admin access through HTTPS to the session that is matching the policy set on ISE to which this authZ is associated. There are three Cisco AV Pair that we can use for HTTPS accesses through FDM. One for a full admin, another for a restricted admin and the last is for a read only access. Here are these three pairs:
fdm.userrole.authority.admin
fdm.userrole.authority.rw
fdm.userrole.authority.ro
We will call this new profile FDM_HTTPS. Similar to what we’ve done before, at the bottom of the authZ profile page in the Advanced Attributes Settings section click on the yellow little circle next to Select an item, scroll down and click on Cisco:
Scroll down and click on cisco-av-pair–[1]:
Now we need to type the Cisco AV Pair attribute in the empty field. The value as we said above will be fdm.userrole.authority.admin, then click Submit to save:
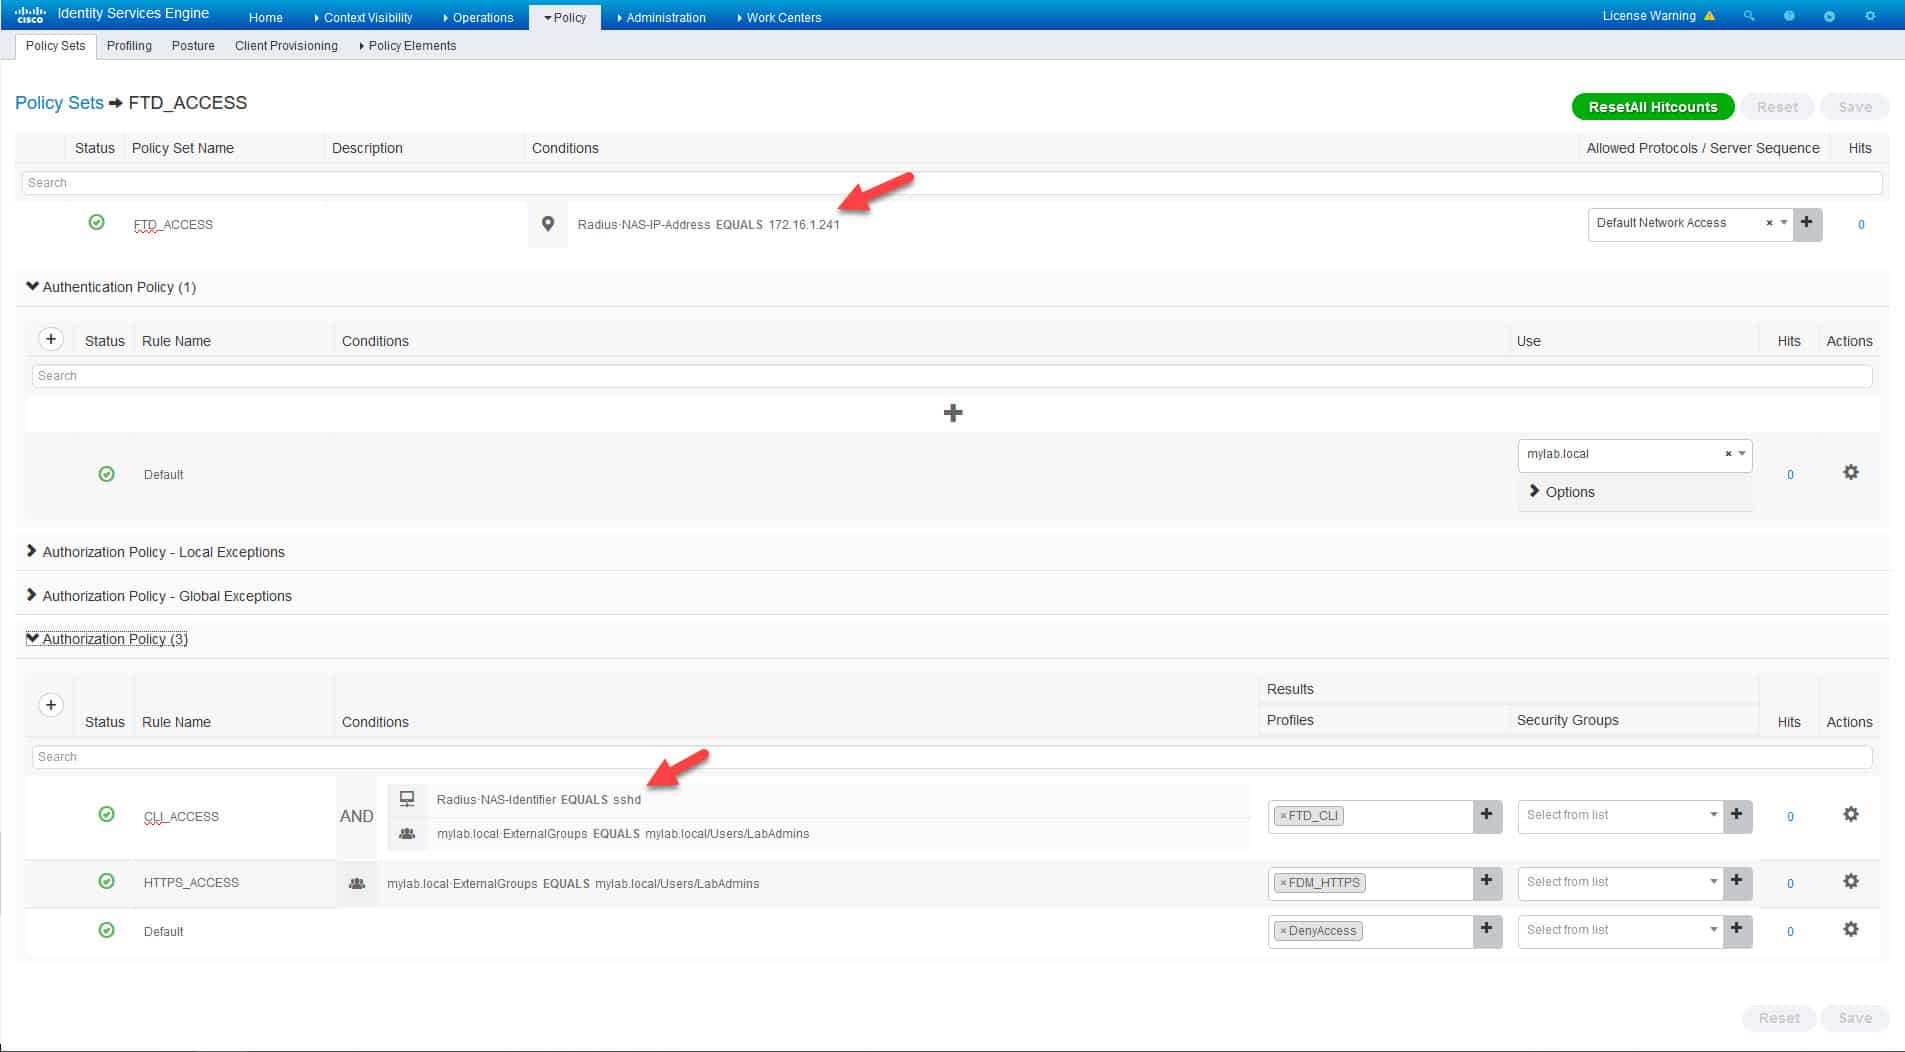
ISE POLICY SET
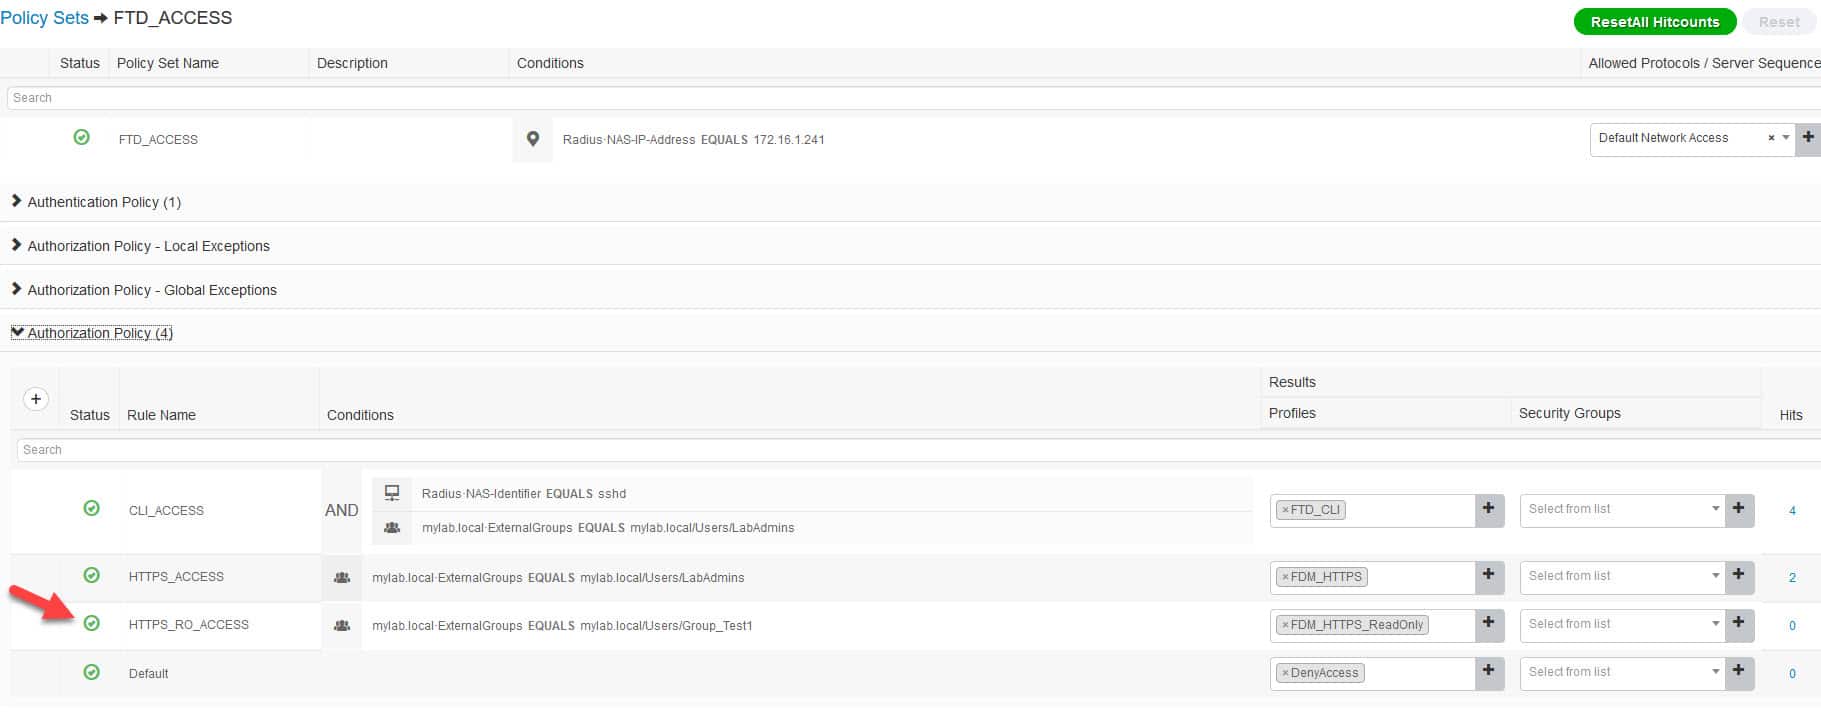
Now let’s configure ISE policy set. The top condition in the policy set will check against the FTD management interface IP address 172.16.1.241, the authC rule will check against our AD, and finally the authZ rules will check against the AD group LabAdmins where the admin users will be located. Each authZ rule will apply a different authZ profile. One of the authZ rule will have one more condition which is the RADIUS NAS Identifier sshd, this condition will match the SSH connections. This is how the policy set looks like:
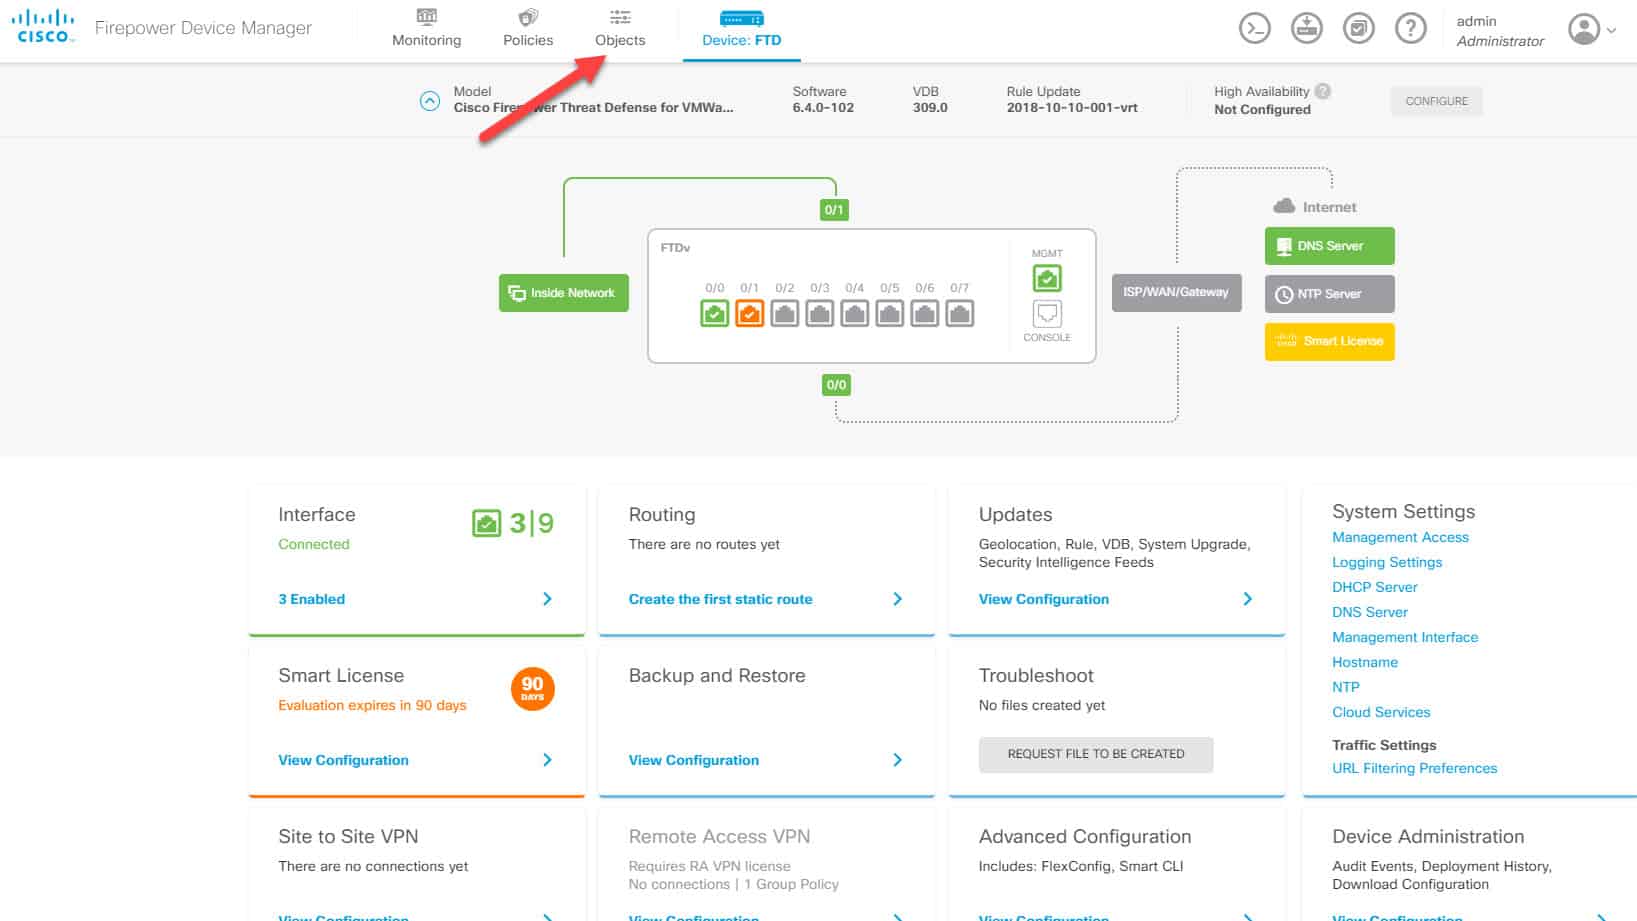
We have completed ISE configuration, let’s now move to the FDM. On the FDM we need to create ISE RADIUS server, a RADIUS group and finally associating this RADIUS group to the management accesses for both SSH and HTTPS.
FDM IDENTITY SOURCES
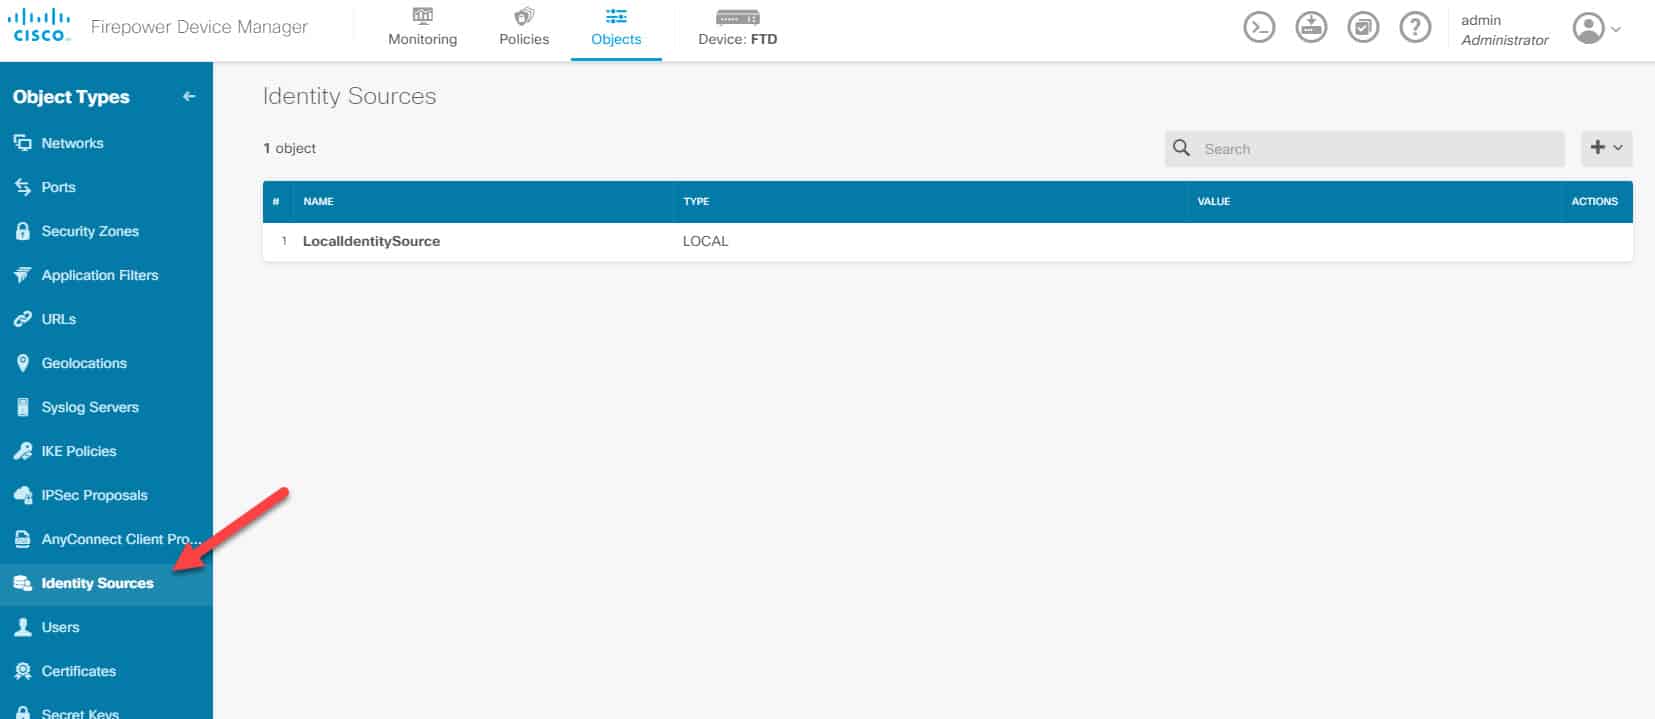
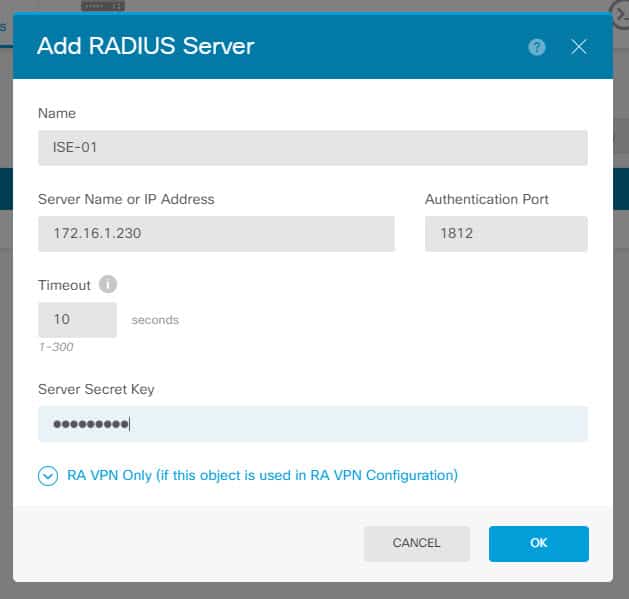
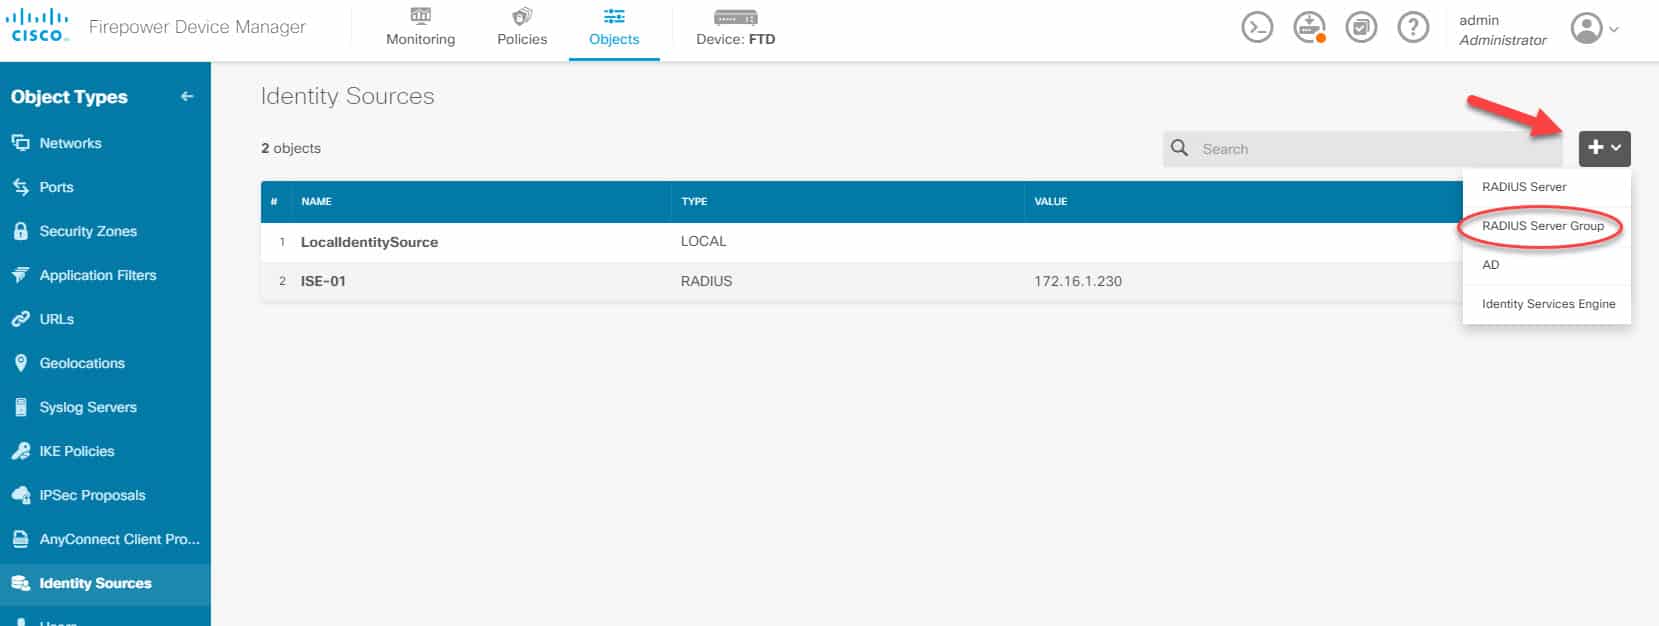
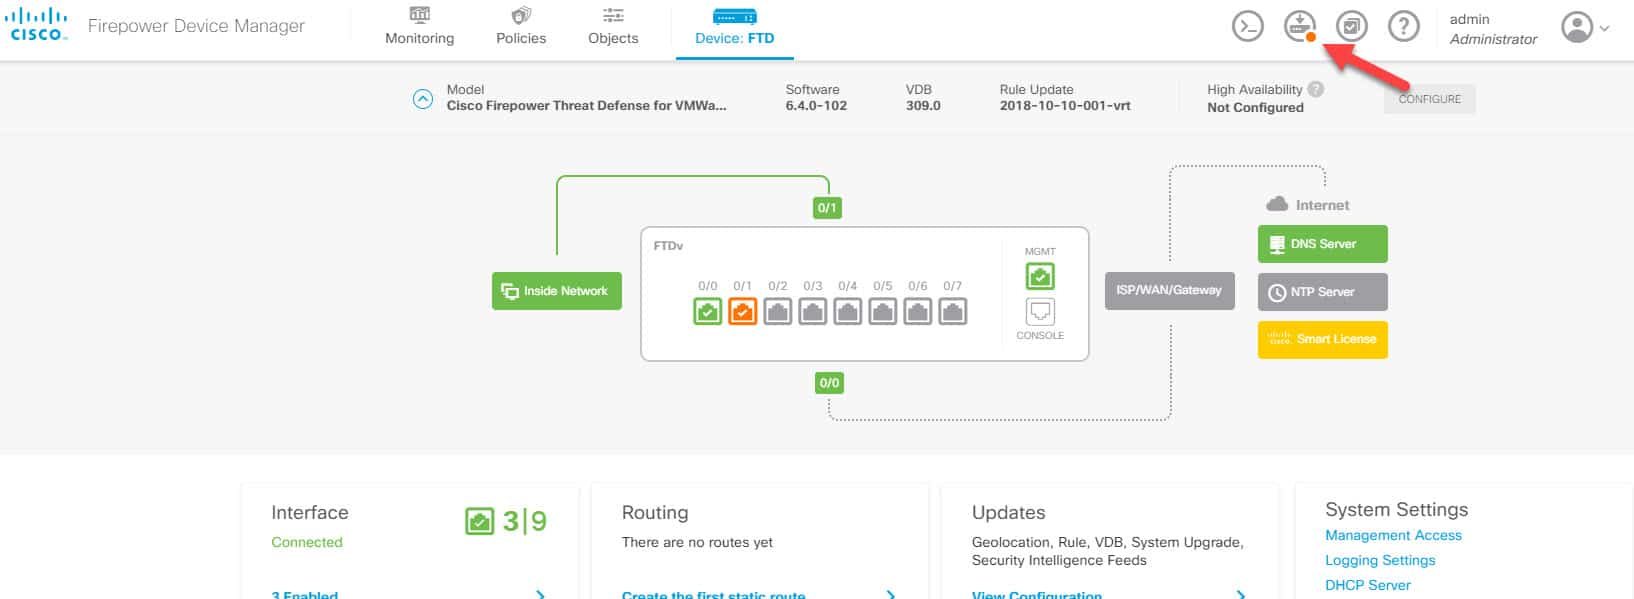
From the FDM main landing page go to Objects and then go to Identity Sources:
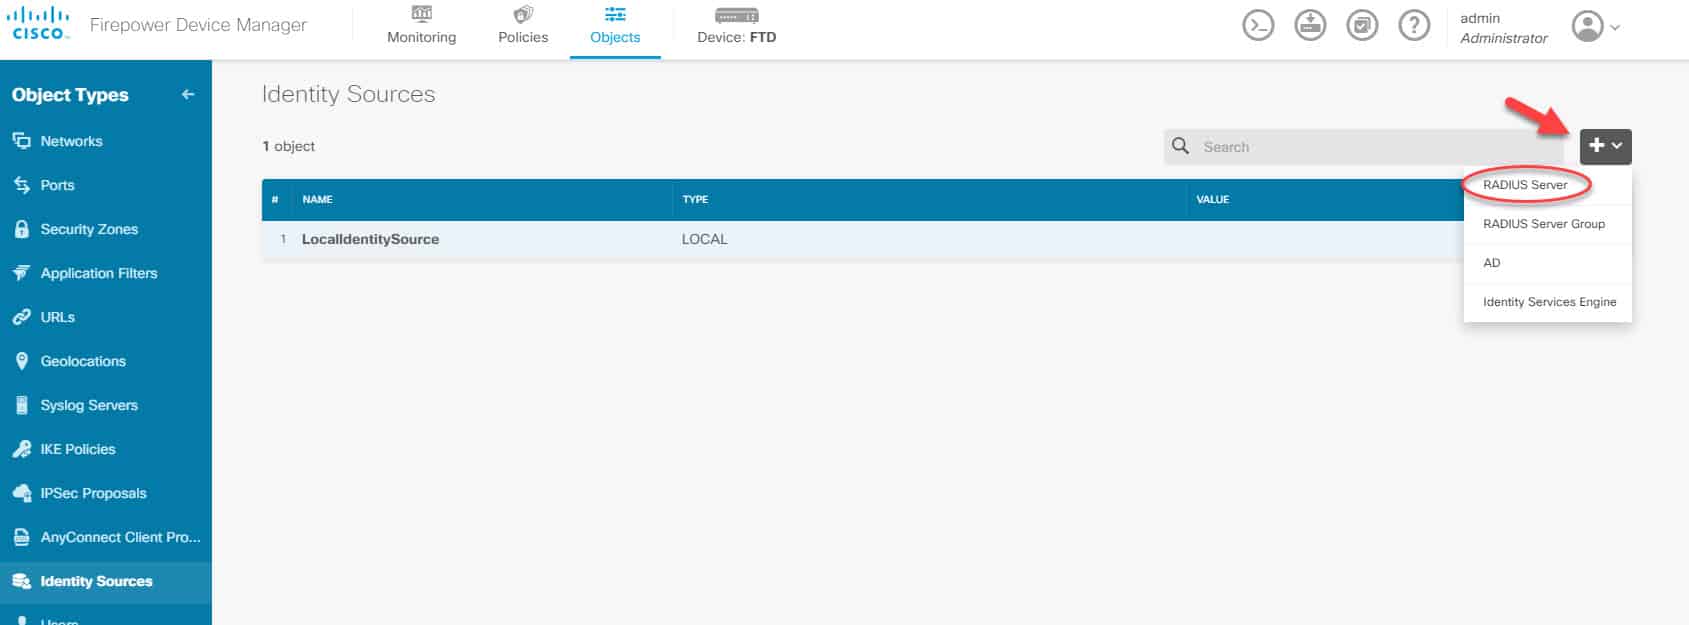
Click on the + sign to the right, and click on RADIUS Server. Then insert ISE RADIUS server details along with the RADIUS preshared key which will be the same as the one that has been configured on ISE. That preshared key was configured on ISE when the FTD was added as a network device:
Now we need to click one more time on the + sign but this time to create the RADIUS group and add the RADIUS server we created previously to it. We will call the group ISE_RADIUS:
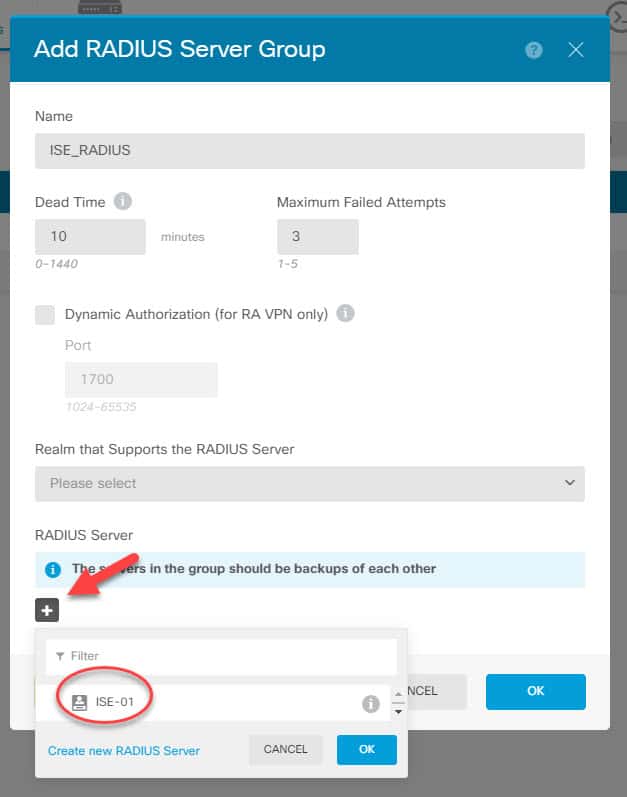
You might be wondering why we need to create a RADIUS server group if we have only one single RADIUS server!. The answer is because from the management access configuration page we can only point to a RADIUS server group instead of to an individual RADIUS server.
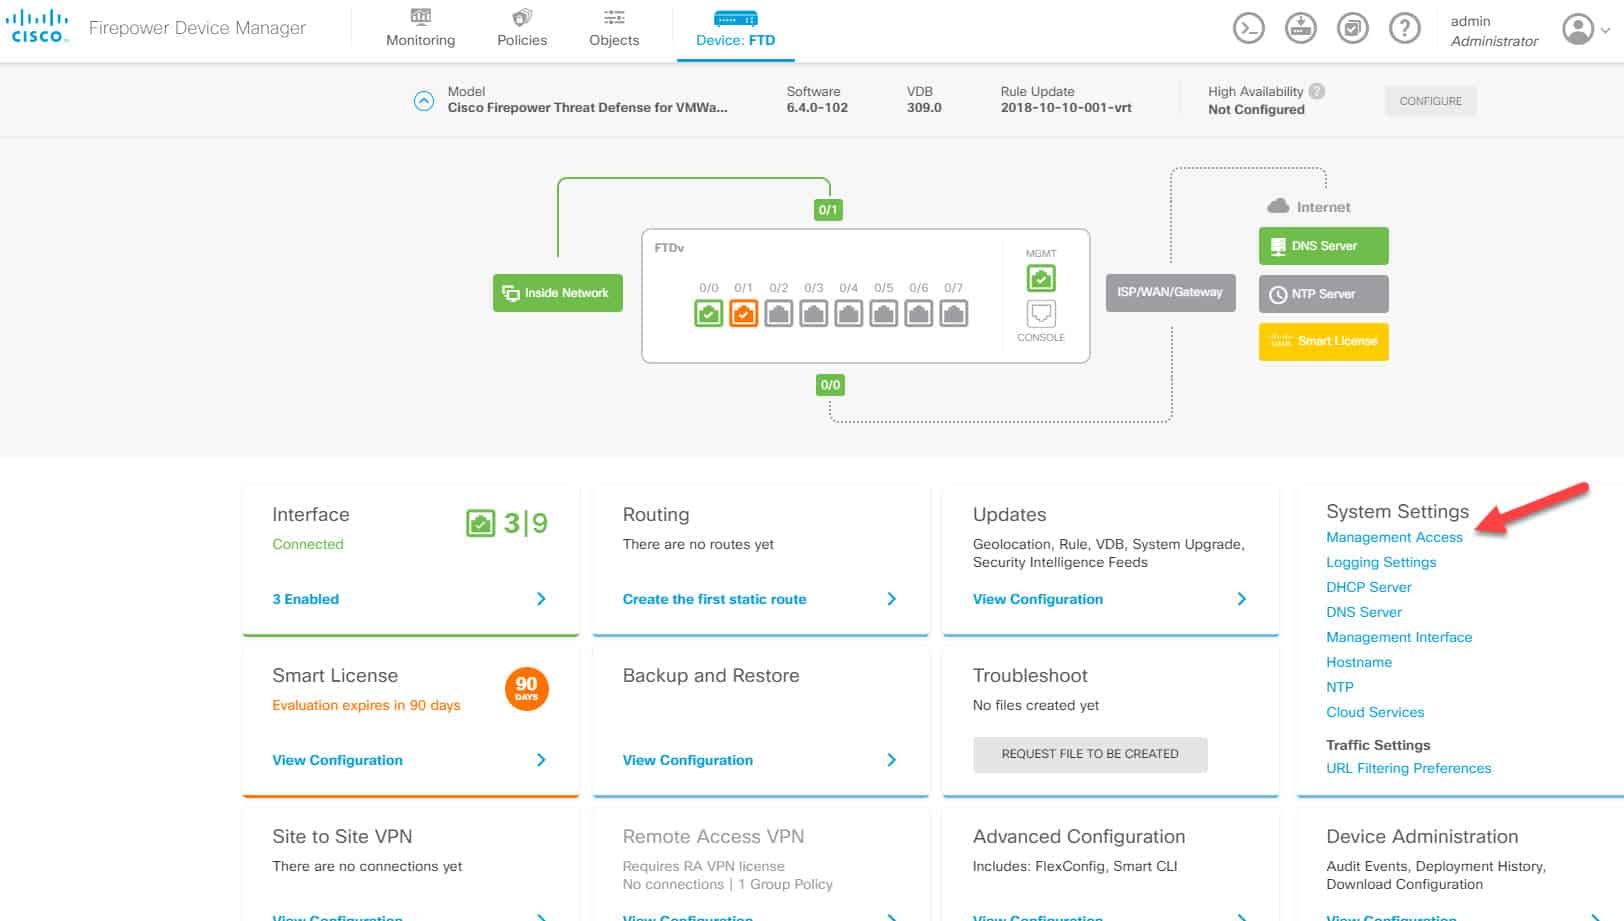
FDM MANAGEMENT ACCESSES
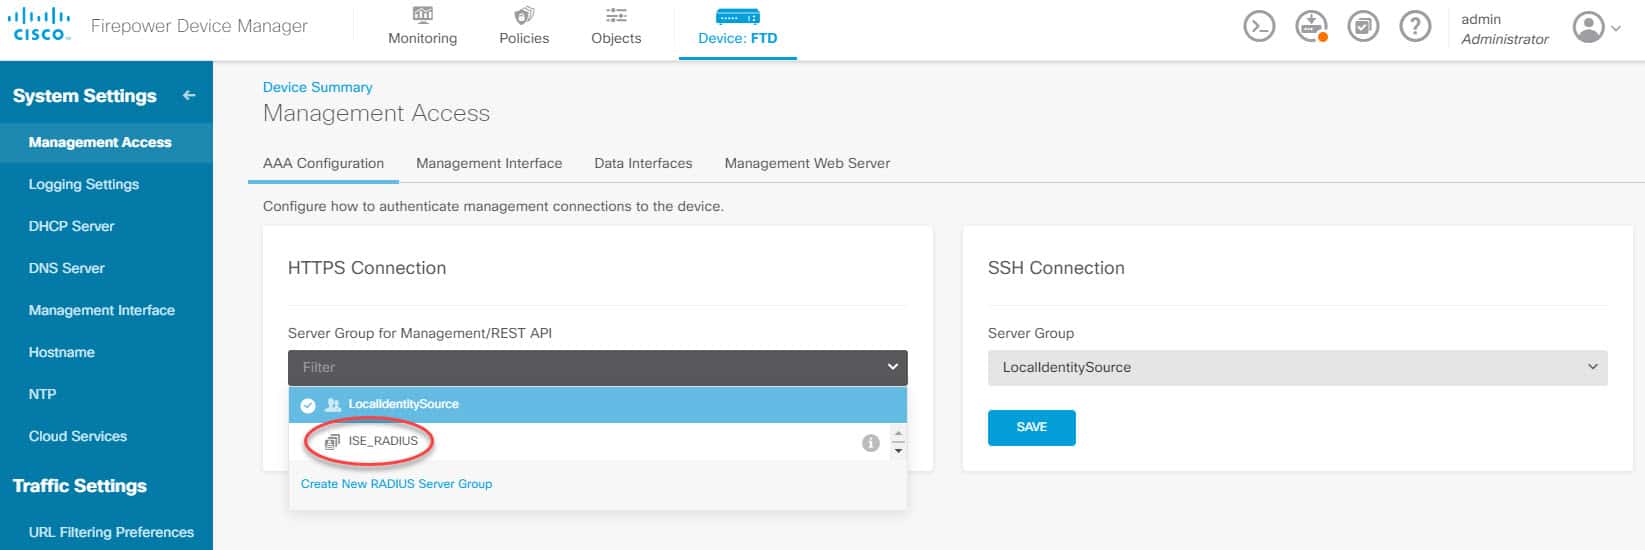
Now we need to go back to the FDM landing page and click on Management Access. In both HTTPS and SSH sections click on the Server Group and change it from LocalIdentitySource to be the new RADIUS group we’ve created which is ISE_RADIUS:
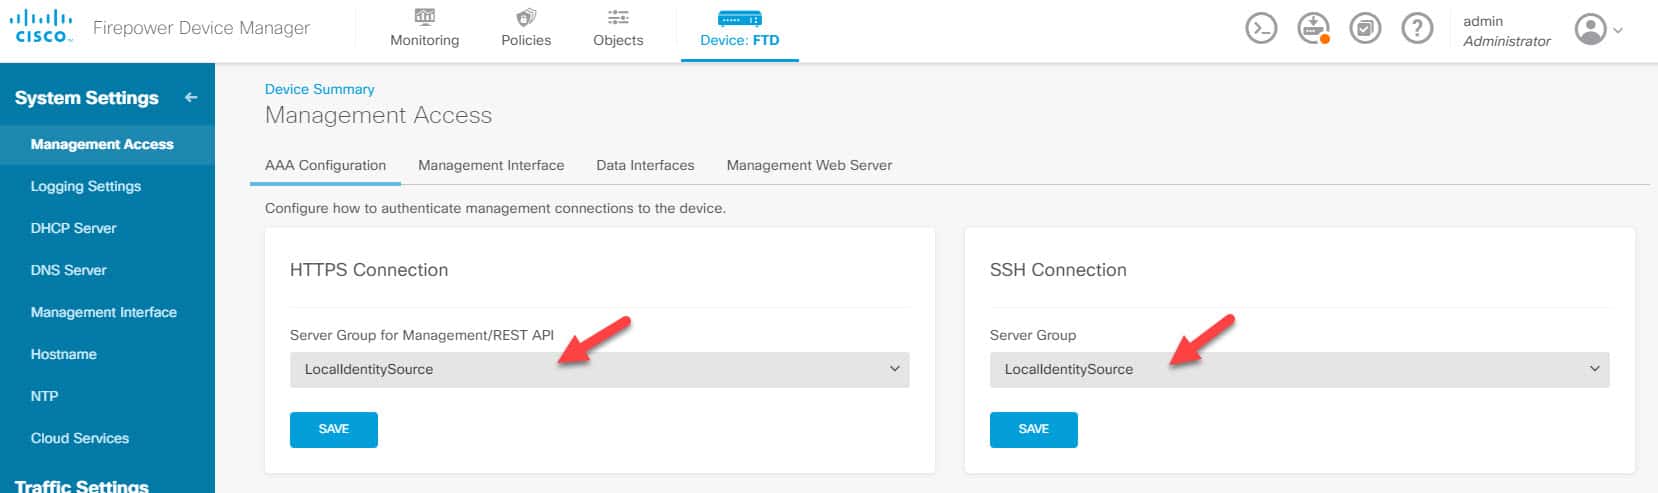
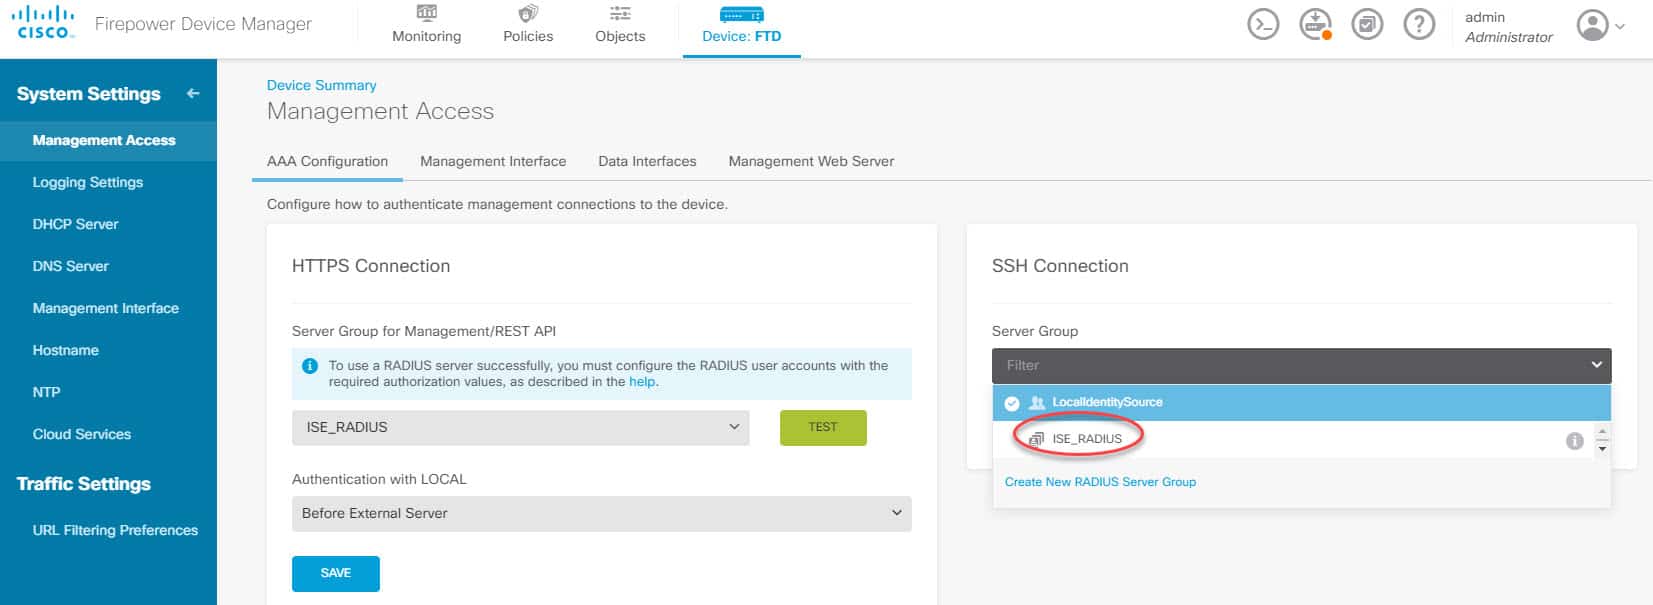
The Authentication with LOCAL option is to provide a fallback in case the external server is not reachable. Although we can change the order for HTTPS connection the default order is Before External Server.
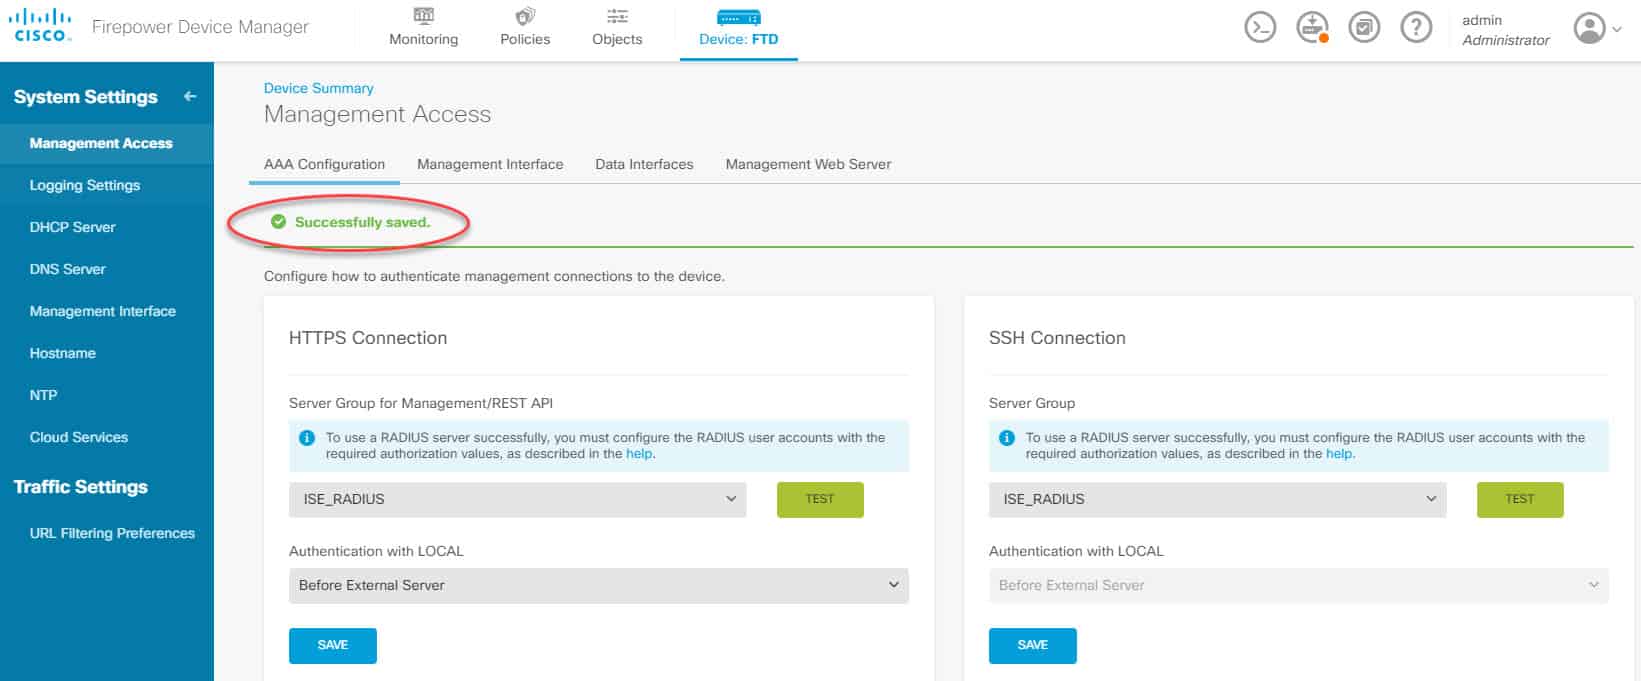
Now that we changed the server groups we need to click on Save under each section. When we click on Save button for each section we will see an individual Successfully saved. message on the page:
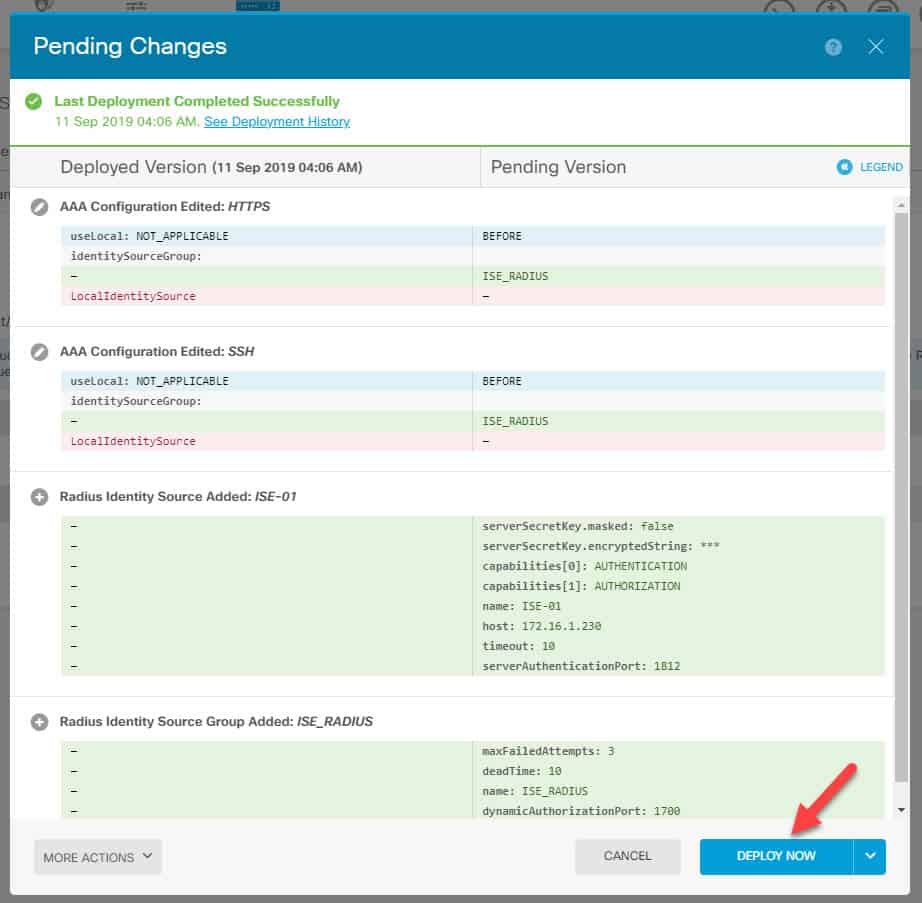
FDM DEPLOY CHANGES
Now it is time to deploy the changes. To deploy the changes go to the FDM landing page and click on the Deployment icon on the top right and click on Deploy Now:
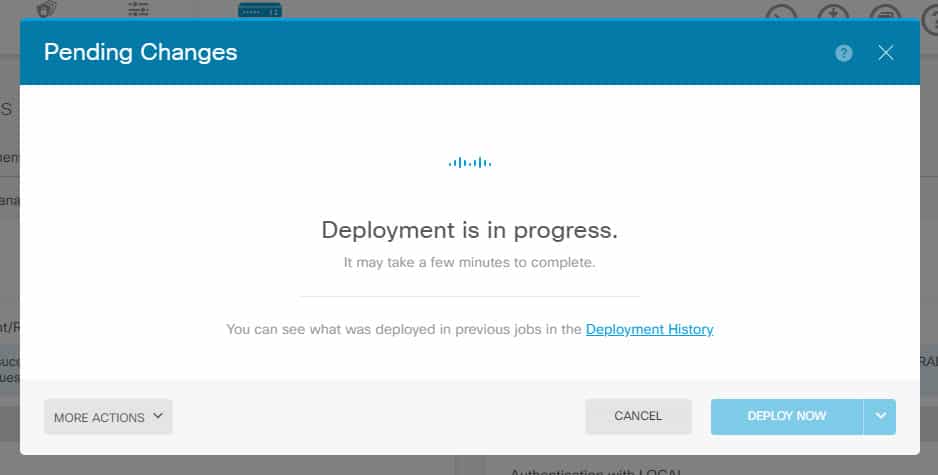
This is how it would look like right after we deploy the changes to the FTD:
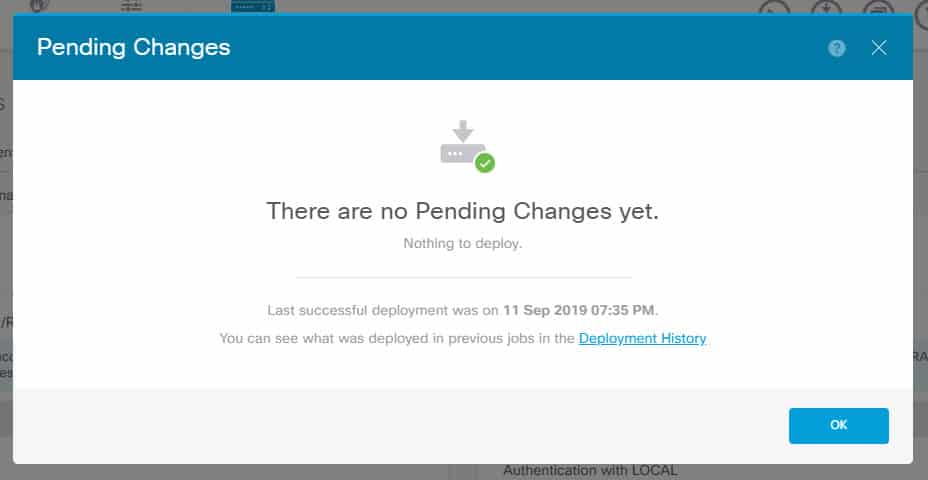
And this is how it would look like once the changes have been successfully deployed:
SSH ADMIN ACCESS VERIFICATION
Finally it is time to test :). We will first start with SSH connection, the username we will use is admin1:
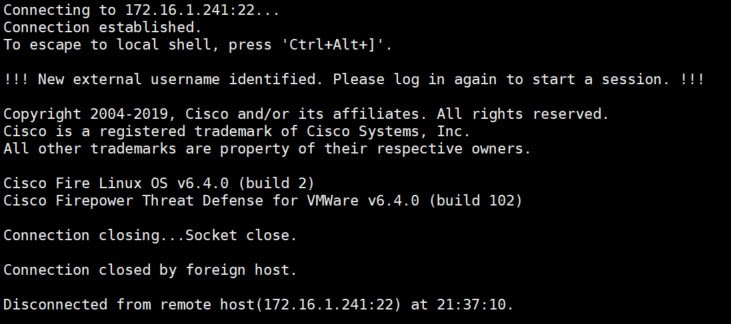
It does not seem to be working right?!. Let’s have a closer look at the output:
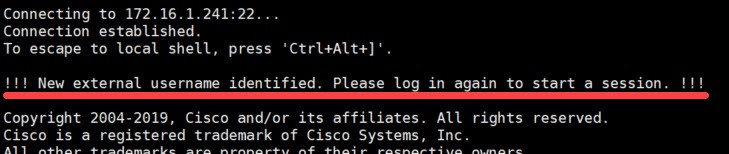
We can see that the FTD purposely disconnected our session, and it is asking us to log in again to start a new session. The reason behind this is that the first time a user connects to the FTD, the FTD creates kind of a profile for that user. This does not mean that the FTD will add that user to its local database. Instead it would mean that FTD created a space for that user which is a requirement for the FTD to be able to create a session for that user.
The FTD can’t do this operation and creating a user session at the same time, this is why the connected user gets disconnected by the FTD. Next time the user connects everything should work as expected, we will verify this in two seconds.
Keep in mind that not all the emulators would show you that message. For example, Putty does not show any thing, its window just gets closed. However, other software like Xshell which I am using in this lab it shows that message. Xshell uses a landing page where the previous session output will still show up after it got disconnected.
Now let’s try again and see if this time it works:
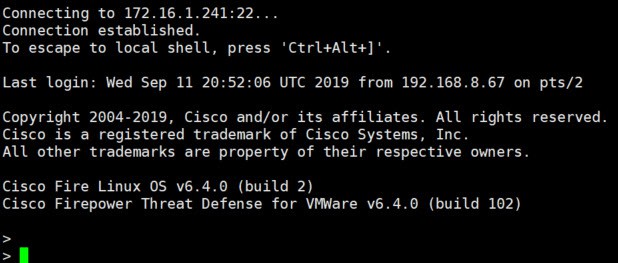
This time it worked!
SSH ADMIN ACCESS ISE LOGS
Let’s see what logs do we have on ISE for this connection:

All looks good!
HTTPS ADMIN ACCESS VERIFICATION
Now let’s test the HTTPS access. We will use the same username we used for SSH access which admin1:
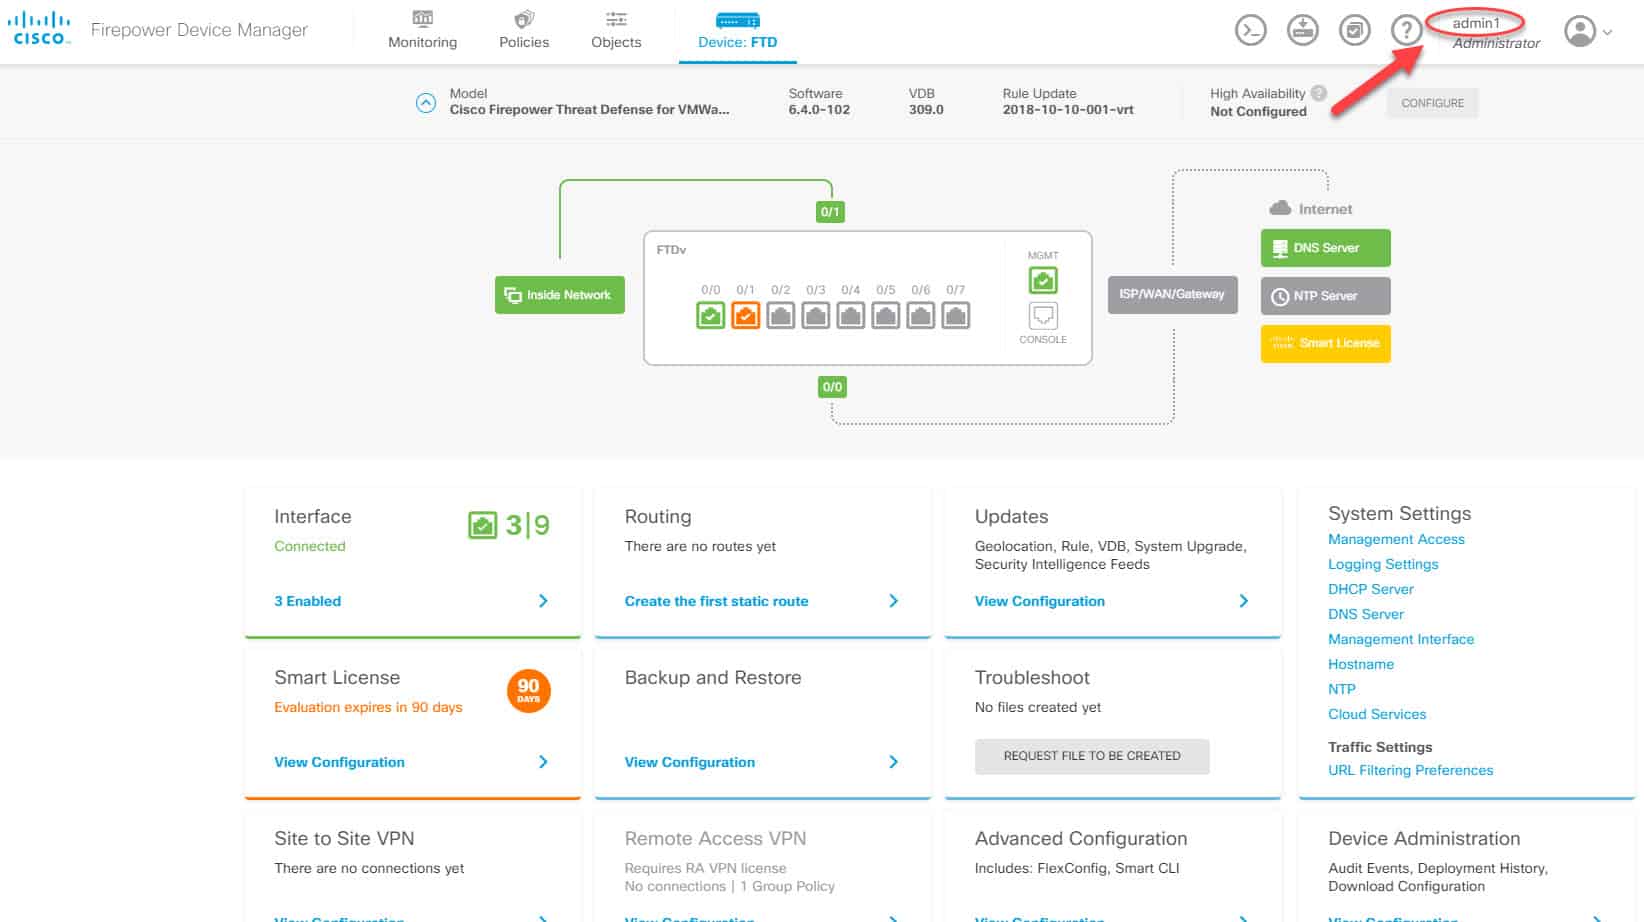
As we can see, also the HTTPS access worked as expected. The HTTPS session was successfully created for admin1 account. We also can verify the user role underneath the account name which in this case it shows as Administrator. ISE logs look good as well and we can see the FDM_HTTPS authZ profile was applied:
HTTPS ADMIN ACCESS ISE LOGS

ISE HTTPS READ-ONLY AUTHZ PROFILE
Last thing we are going to do for this lab is to create a read only policy for HTTPS access. Here are the relevant changes on ISE. We created a new authZ profile called FDM_HTTPS_ReadOnly and we assigned the Cisco AV Pair value fdm.userrole.authority.ro. After that, we added a new authZ rule to the policy set to match the AD group Group_Test1 to which the read only user account rouser belongs:
HTTPS READ-ONLY ACCESS VERIFICATION
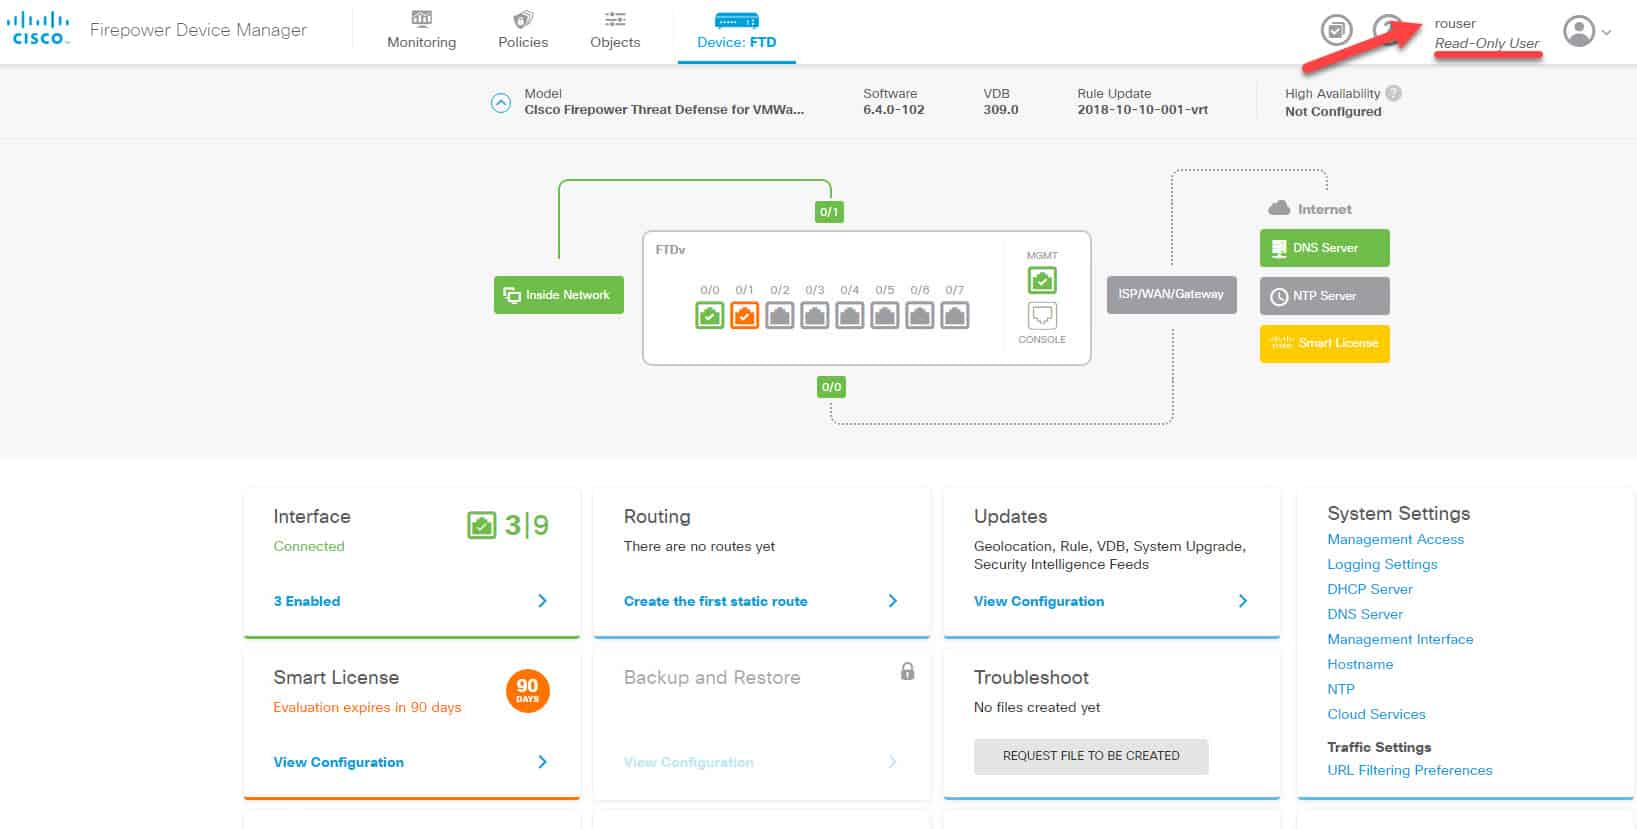
As we can see, FDM clearly states that the user rouser is a read only user. However, by looking at the FDM landing page we don’t seem to have any less options comparing to when we logged in as admin!.
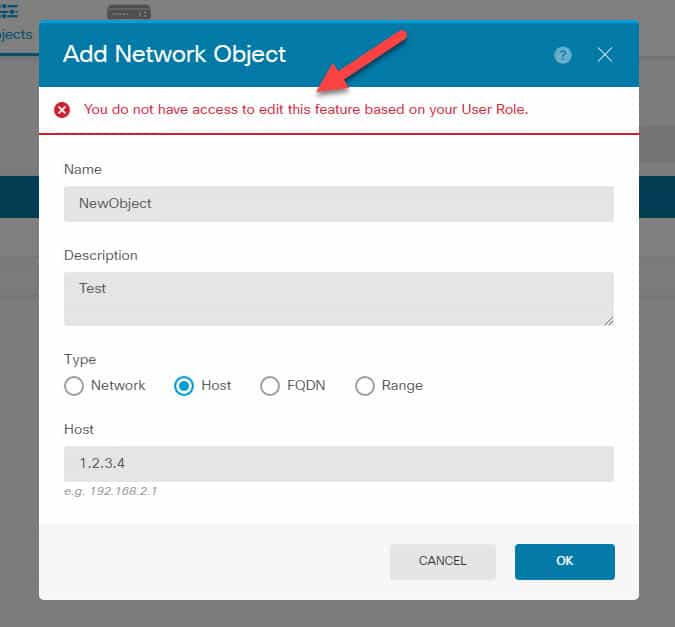
The thing is that although we see all those configuration parts, if we try to make any changes we will get an error complaining about our restricted role similar to this:
This wraps up our creating multiple admin accounts for FDM post. As you could see, it requires applying a few configurations but after all it is definitely worth it to secure your environment. I hope you enjoyed it and thank you for reading!
Share via:
Excelente
Tanks for a very thorough and well-written article. And I am happy to see a fellow Xshell user!